Tutorial: Prototype a Simple To-Do App Using Origami Studio and Firebase
Build an on-device prototype that uses live data — no coding required!
As a UX Engineer, I take pride in learning about a variety of tools that can be used for prototyping and feature development. Two of my favorites are Origami Studio and Firebase. Origami is great for developing high-fidelity prototypes that users can play with on-device, and Firebase is a groundbreaking way to work with data in real time. When I saw Scott Horsfall’s post on Dribble announcing Origami Studio’s new Network Request patch, it seemed like a promising way to bring two of my favorite tools together.
Facebook Design has put together a great tutorial on how to use this new feature using the iTunes Search API. I used this tutorial as a jumping-off point in my exploration of prototyping with Firebase.
If you’re familiar with both of these tools, feel free to jump in and tinker with the prototype file linked below. If you are new to either of these tools (or both), I hope that following along with help you appreciate them as much as I do!
Getting Started — Download To-Do App Prototype Template
There’s already a great tutorial on prototyping with data over in the Origami Studio docs. If you’re not familiar with how data and loops work in Origami studio, I strongly recommend reading these docs first.
To save you some time, I’ve put together a prototype of a basic to-do app that uses the method outlined at the link above. You can download the prototype on Dropbox using the link below. Hopefully this will help you to dive right in and play with Firebase:

The sample to-do app comes with a sample data set of three items, which are hard-coded as a JSON object. It also includes a pull-to-refresh component, a modal and form for adding a new item to the list, and checkboxes that change the state of an item when its toggled. None of these are functional yet, but we’ll wire them up in the next part.
Jumping in to Firebase
Firebase allows users to read and write data in real-time. It’s a schema-less database that has unlimited flexibility when structuring your data. They’ve been developing enhanced features for the last few years, and it’s an increasingly popular platform for working with a database in the cloud.
- If you don’t have an account, visit https://console.firebase.google.com/ and log in with a Google account.
- Click “Add Project”
- Name your project and agree to the terms and conditions.
- Firebase will now set up a database! It’s that easy!
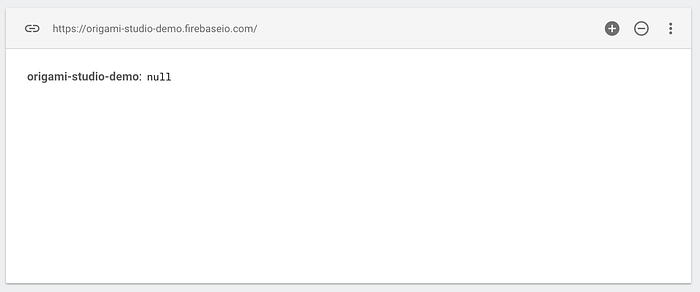
You’ll notice that your database is empty so far — but it won’t be for long! Let’s head over to Origami Studio and start writing to this database.
Hooking Firebase to Your Prototype
Typically, I’ve connected to Firebase when using React or NodeJS. This connection creates reference to the database that reflects changes in real-time. The Network Request patch in Origami Studio is pretty limited, so we’ll be constrained to using the REST API provided by Firebase.
Note: I’ll be leaving the database in “development/test mode”, which means it allows read and write access without authentication. To create a more secure endpoint, it’s possible to append a key to the URL and use the REST API that way.
Firebase’s API allows you to send a POST request to a URL structure like the one below. You can use this URL to the “URL” field in the Network Request patch. Here’s an example of how I set up my prototype request URL:
https://[PROJECT_ID].firebaseio.com/todos.jsonNext, change the Method on the Network Request patch to POST.
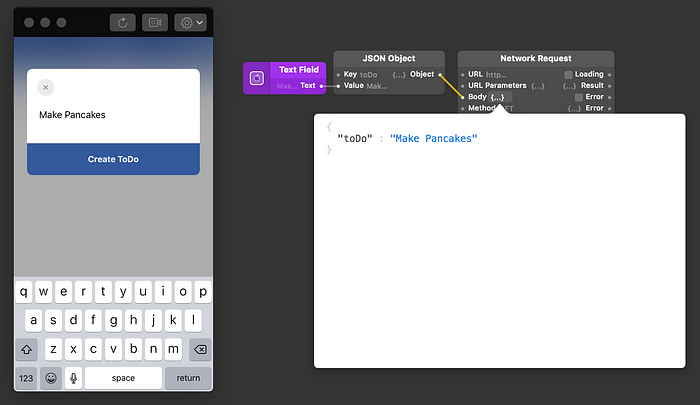
Without a body (formatted as a plain object), our POST request will return an error. Let’s add a body for our ToDo message. We’ll want to use the form field in the modal to create a new ToDo.
- Add a JSON Object patch to your Origami project.
- Right click on the patch and change it’s type to “Text”
- Set the key field to “toDo”
- Hover over the text field component and click Touch to access/add the “Text” output to your project.
Connect the text to the Value field of your JSON Object patch. Then, connect your JSON Object patch to the Body field on your Network Request patch. Now, you should be able to see our object, formatted properly and ready to be written to Firebase.
In the previous project, the “Create ToDo” button in the modal was wired up to simply dismiss the modal. Now, we want it to do one more thing — submit our network request with the information we’ve added in the text field.
Hook the “Create ToDo” tap action to the Request receiver on the Network Request patch. Now, when we tap “Create ToDo”, not only is our modal dismissed and the field cleared, but the text we added to the form is sent as a “toDo” and written to Firebase.
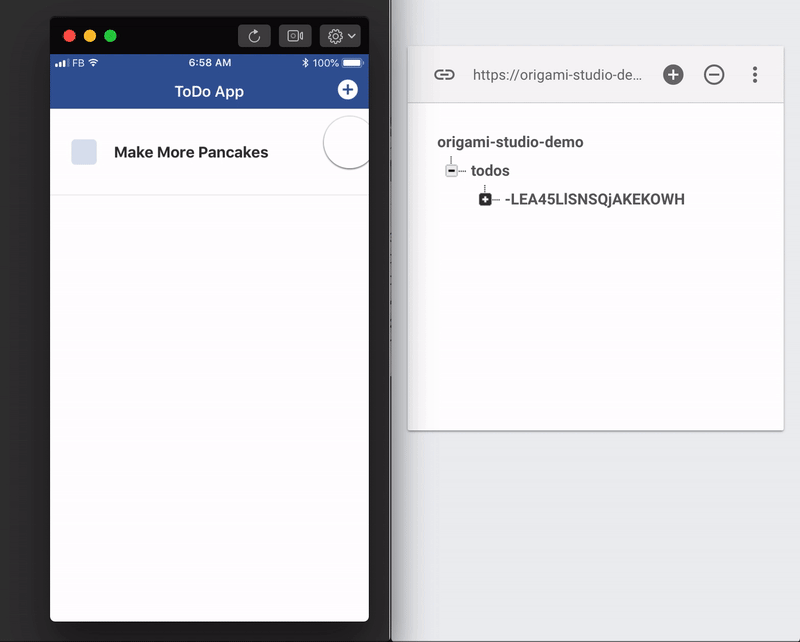
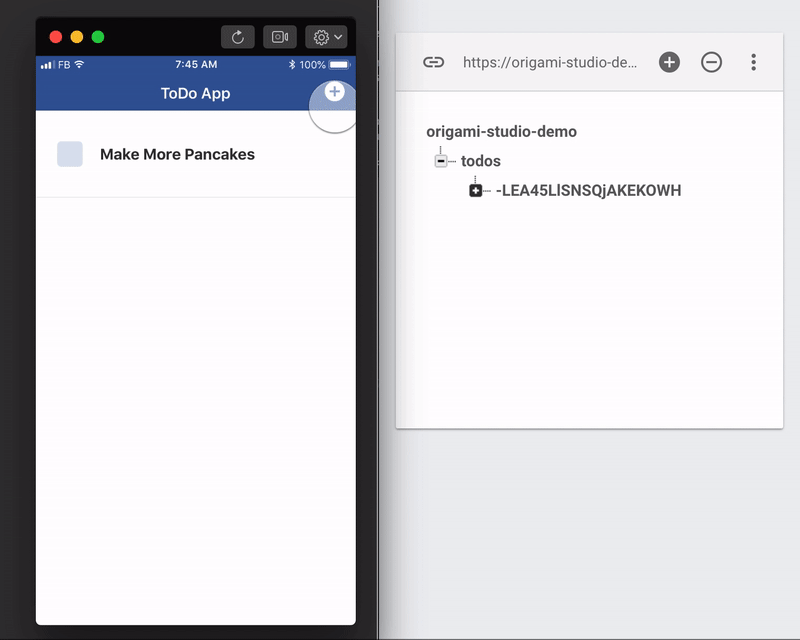
You can see the data being written in real-time. If you click on the data tree in firebase and expand it, you’ll see the unique key/id generated by firebase as a result of using the POST method to write data.
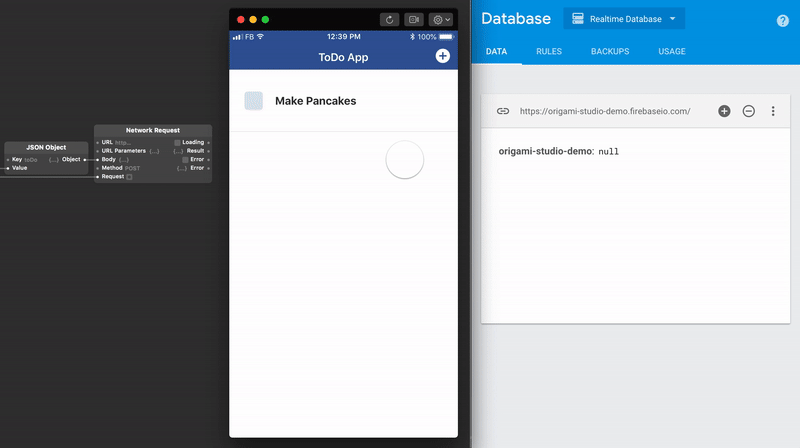
Using Firebase Data to Render Our ToDo List
We’re still showing a single, static ToDo item in our list — this isn’t coming from our database. Now that we have data, let’s use it to render our list of ToDos.
Add a new Network Request patch and use the same URL you specified in your POST request. Select GET for the method and hook it to your “when prototype starts” listener patch. Now, every time your prototype loads, you’ll see the data from your database in the Result.
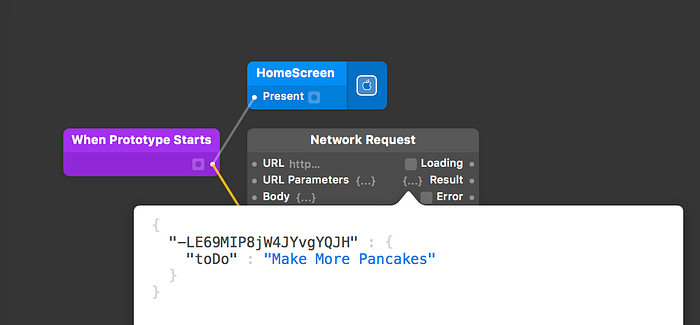
We can then use this object to replace our hard-coded set of data. Because of the way data is structured in Firebase, you’ll want to specify the path to your data using the Value at Path patch. Set a wildcard value (*) to represent the key/id, along with the key you want to access (in this case, it’s ‘todo’). Note that these two values are joined by a (.) per Origami Studio’s documentation.
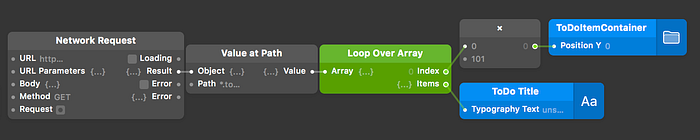
You can then loop over the array of values, just like we did with our static JSON object.
One of the coolest things about Firebase is that you can use it to work with live, real-time data: changes to the database are automatically synced with the DOM when you use the Firebase API. Because we’re using their REST API and we’re limited to GET and POST requests, we’ve got to trigger a new call after we’ve added a new item if we’d like to see it in our list.
Let’s add a Wireless Broadcaster patch to the Network Request that we configured to POST our new todo items.
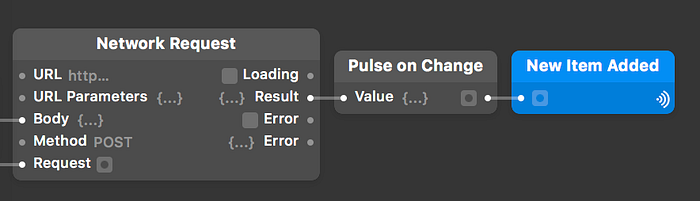
We’ll hook it up with a Wireless Receiver patch that connects to the Network Request that fetches our todo list items.
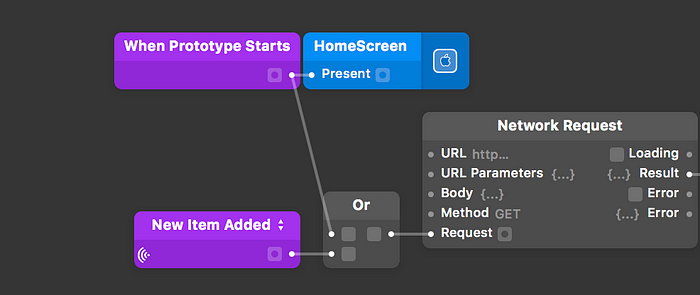
Now, every time we load the prototype or add a new item, we’ll trigger a request to fetch the list so we always have the most up-to-date data.
You can also hook the request to other actions, like the pull-to-refresh action that’s in the project template.
One thing I learned is that Origami Studio doesn’t like it when Firebase returns a null result. This isn’t returned as an error — since the request was technically successful — there’s just not any data to show. This crashes Origami Studio. I haven’t yet found a great way to validate the data in a patch, but this is something I’m continuing to explore as I play with the Network Request feature.
Extending Origami Studio + Firebase with NodeJS and Heroku — Advanced
We’ve pretty much reached the limit of what Firebase and Origami Studio can do on their own: none of the patches seem to provide an efficient way to access the keys generated by Firebase. Additionally, the Network Request patch is limited to a GET and POST request. The Firebase REST API can accept PUT, PATCH, and DELETE requests, too.
Firebase does have a method override, but the Network Request patch doesn’t yet have the ability to set headers. So for now, I had to come up with a different solution. I know I said this tutorial wouldn’t include any coding, but I simply couldn’t find another workaround right now.
While this is just one possible solution and it’s very experimental, I did want to share how I was able to delete individual items in sync with the server because it provides a glimpse of what’s possible with Firebase’s API. You can see how I am now adding and deleting items in Firebase:
Essentially, I wrote an endpoint that takes a set of parameters and interprets them before relaying the request to the Firebase REST API along with the desired method override header.
Here’s a rough chunk of code that accepts the request and grabs the id of the item we want to update in Firebase:
app.post('/origamifire/:projectName/DELETE/:index', function(req, res){
  for (var dataObject in req.body) {
    obj = JSON.parse(dataObject);
    var itemToUpdate = Object.keys(obj)[req.params.index];
    deleteItemFromFirebase(req.params.projectName, itemToUpdate)
  }
  res.sendStatus(200)
  var error = function (err, response) {
    res.send(err)
  };
})
And another rough deleteItemFromFirebase function that uses a request and the DELETE override from Firebase’s docs:
function deleteItemFromFirebase(projectName, id){
  var options = {
    headers: {
      'X-HTTP-Method-Override': 'DELETE'
    }
  };
  var url = 'https://'+ projectName + '.firebaseio.com/todos/'+ id +'.json'
  request.get(url,options,function(err,res,body){
    if(err){
      console.log(err)
    }
    if(res.statusCode !== 200 ){
      console.log('success')
    }
  });
}
Because the request is sent as part of a loop in Origami Studio, I ran into some trouble calling the reload function just once. For now, to see the updated list after deleting an item, the prototype needs to be refreshed manually.
While I was mostly successful at creating and deleting items in Firebase, I reached the conclusion that these two tools are a perfect fit for one another — at least not yet.
Origami Studio has moved one major step closer to working with live data in Firebase with the addition of the Network Request patch. Adding the ability to select additional request types (like DELETE) or a way to specify headers, as well as an easy way to access keys in the loop would help to take this great prototyping tool even further.