Tutorial: Become a master of isometric illustrations — 3D Effects technique
Learn how to create catchy isometric illustrations with no grid, using 3D effects in Adobe Illustrator.

Whether you want to bring some life, visualize boring data, explain the onboarding process of your app or avoid using low-quality photos your client provided you with, illustrations got you covered on all fronts.
Isometric illustrations are one of the most popular styles in the recent years because of their three-dimensional representation of depth in 2d space. And now you can become a master of them in this 6 step tutorial! Impress your clients, delight users and step up your illustrations skills.
I created my first isometric illustration some 7 years ago, while studying painting. I googled a few tutorials and opened Illustrator. I drew isometric grid, a square, skewed it-30°, rotated it -30° and figured this is a very strange process. I thought there must be something far simpler and more effective.
Good news — there is! 3 simple 3D effects such as Extrude & Bevel, Revolve and Rotate. I personally find this approach to be the fastest and simplest. And that’s why I have decided to share this tutorial with you.
This tutorial will dig deeper into one of the above mentioned effects — Revolve. Nevertheless, the knowledge you will acquire is applicable to the use of the remaining two as well. The tutorial is in principle very simple and suitable for slightly advanced users of Adobe Illustrator.
Let’s do it!

Do you like beer? Well, who doesn’t. Let’s create an isometric beer bottle with a label. Pretty simple.
TIP: Before you start do not forget to find a few references to the object you are about to design (beer bottle in this case), draw a few sketches and contemplate what our final scene will look like.
1. Step — Draw your bottle and “beer”
- Open Adobe Illustrator and create a new document.
- Draw your very own bottle design. With or without the liquid inside, it is up to you. It is important that you draw the design from the front view splitted into half. Just like in the image below. The reason will become obvious in the next step. A stroke XY pixels wide is sufficient for the shape design. The stroke basically defines the thickness of glass.
TIP: I recommend to copy the artwork out of the artboard for further use and backup purposes.

2. Step — Apply the Revolve effect
- As the name suggests in a self-explanatory way, the Revolve effect will revolve the shape around its axis. The position of the revolve axis in Illustrator is fixed vertically, which is why we needed to draw the shape from front view and split in half.
TIP: Make sure that Fill color for the object does not contain a gradient. You will thank me later.
- The path to find the effect is following: Effect > 3D > Revolve…
The dialog window offers you to choose Position, which is key in this case. Thanks to setting the position to Isometric (Left,Right, and so on) we will obtain the required shape in Isometric Projection. - Angle — the degree of object rotation around axis. If set to 180° the result will be a bottle vertically split in half. Set angle to 360° for fully revolved object.
Offset — from — control the offset from vertical axis — apply 0px for our case.
Surface — setting of the object material and lighting. For additional edits I recommend to set Surface to No Shading.

Ta-da! We have created an isometric beer bottle. Now let’s take a cold one from the refrigerator. Or no, stop, let’s create the label. The label placement is indicated below.

3. Step — Prepare the label
- We’ll use the original artwork to define the label dimensions. As you can see in the image below, the label height is clear. For the bottleneck label an approximate height is sufficient as the surface is not perpendicular. The label length is calculated using simple circle circumference formula 2πr.
- When you create a satisfactory label, convert both designs to symbols. The symbols palette can be found under Window > Symbols (alt + shift + cmd + F11). Simply drag & drop the design to the palette to convert it to symbol. Symbols in Illustrator works similarly to Sketch.
- Now you can map the converted label design to the bottle you created previously using the Revolve effect.

Step 4 — Map the label on your bottle
- Let’s get back to the bottle itself. In case you have not vectorized the bottle using Expand Appearance function, you can still fully edit it. Change the shape, set material and mainly map the bottle label. The process goes like this. First display the Appearance palette (Window > Appearance) and select 3D Revolve option. A revolve effect dialog box will appear. We’ve already used that one, remember?
- For mapping the design to object click bottom left option Map art… This will allow us to choose and adjust the desired symbol for our bottle. It is important to select the correct symbol for the correct surface — similarly to what is shown below. Do not forget about Scale to fit option. Follow the same steps to map the second label as well.

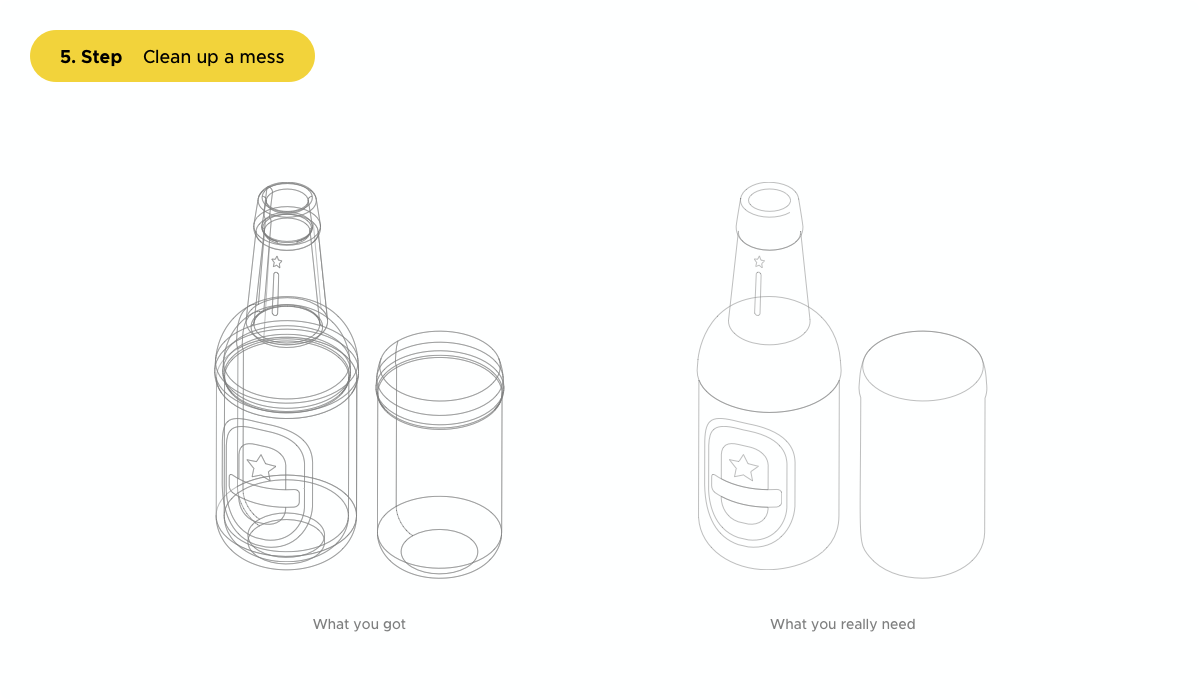
Step 5 — Avoid a messy file!
- If you’re happy with the design, you can finally turn it to bezier curves using Object > Expand Appearance function. As Illustrator is not a tool primarily meant for 3D objects manipulation, you will get an object consisting of multiple smaller elements. If you like to keep things tidy I recommend to reduce the number of elements so that you only keep what you really need. Just as shown in the image below.
TIP: Besides Pathfinder you can use Shape Builder Tool to join shapes into one (Shift + M, hold Alt to subtract shapes).
Note: There are often unwanted anchor points created when joining objects. We can reduce them using Object > Path > Simplify. However, if you use Illustrator regularly I recommend to get yourself Vector Scribe plugin and its Point Removal.
Final step — Bring it to life by colors, gradients and lights
- We are almost there. Now let’s pour some beer into the bottle. What remains to be done is colorization, adding a few gradients, reflection if you wish. Something like what is shown in the image below. I believe you can handle this part yourself.
- I also created a simple beer pad using Extrude & Bevel 3D effect applied on circle. Check effect settings here.

Now you’re master of Isometric illustration. Congrats!

Conclusion
I hope this tutorial set the foundation of your isometric illustrations journey and will help you when creating custom, unique visuals for your design projects. Here are few examples of illustrations I created using 3D effects:


I’d love to see the results of your work and will be grateful for any feedback. Leave me a comment or rebound a shot on Dribbble.
Drink responsibly! Cheers!