Simple Navigation & Tab Switch in ProtoPie
Understand the basics of ProtoPie while creating some common interactions.

ProtoPie is one of the easiest & most powerful interaction design tools to use. You won’t even need more than 1 hour to get the hang of it. This article will guide you through some of the basics to design interactions in ProtoPie.
Important: This is not going to be a quick tutorial. We will learn about the basics thoroughly, so bear with me :)
Now to follow the tutorial, download ProtoPie here!
These are the interactions that will be covered in this article:
- Page Navigation
- Tab Switching
Before We Start
Concept Introduction
To understand ProtoPie, it’s better if we understand the concept of an interaction in ProtoPie. Basically, an interaction consists of 3 main elements, which are Object, Trigger, and Response.

An interaction happens when you set off a Trigger of an Object which results in a Response from the object. In the image above, the trigger is tap action, and the response is the movement of the object.
However, the relationship between Objects, Triggers, and Responses can be even more complex than that. We’ll get to that later on.
Importing Your Design
Before we can create any interactions, we need to import some designs from Sketch or Adobe XD. We can design inside ProtoPie as well.
In this tutorial, we’ll be importing some pages provided in the supporting Sketch file. Download the Sketch file that we are going to use here: Download Material
1. Importing from Sketch
Create a new project. Make sure Sketch is open when importing files and that you are on the right Page. ProtoPie will only detect the artboards in the current Page you are in.
- Go to File > Import > Sketch
- A dialog will pop up. In the Artboard selection, select “Home”. Click on Import.

Now you have successfully imported a Sketch Artboard to a ProtoPie Scene! Keep in mind that in ProtoPie, Artboards / Pages are called Scenes.
2. Add a New Scene
To do some interactions between Scenes, we need to add more Scenes and import a design to it.
On the top toolbar, go to Scene Selection > Add New Scene.
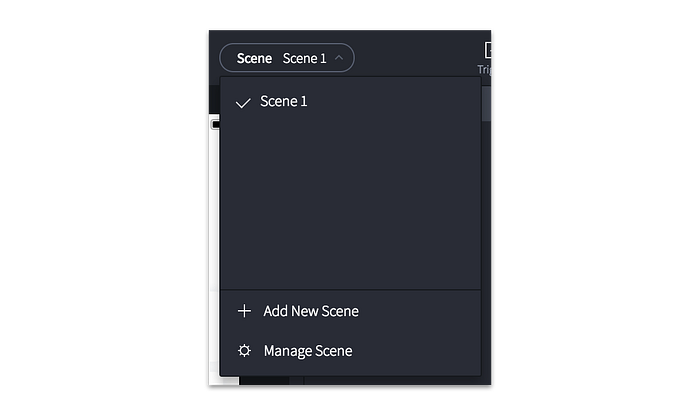
Once you added a new Scene, we will have a blank screen. And from the Scene Selection menu, you can see that we are currently inside of Scene 2.
Inside of Scene 2, using the method we learned earlier, import “Task Detail” from Sketch.
3. Manage Your Scenes
Now, let’s organize our Scenes and rename them for a better documentation. Click on Scene Selection > Manage Scene
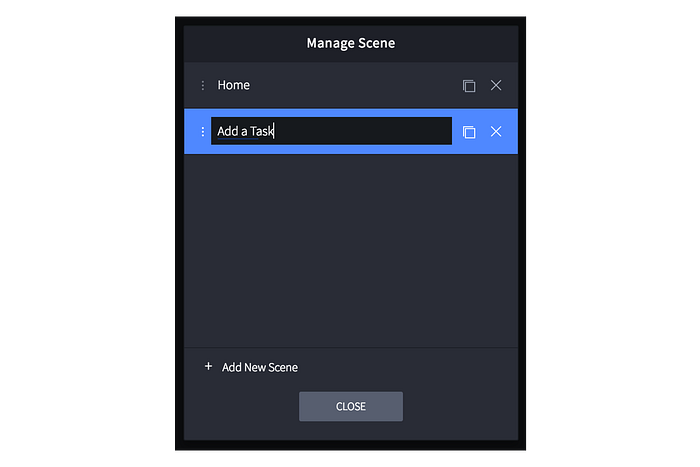
To rename Scenes, double click on their names. You can also duplicate, add, and delete a scene here. Let’s rename “Scene 1” and “Scene 2” to “Home” and “Task Detail”, respectively.
Now that we got everything settled, let’s get started!
1. Basic Page Navigation
In ProtoPie, we can do page transitions effortlessly. Here’s a quick look of the final result:

- Object: Button, Container
- Trigger: Tap
- Response: Jump
1 — Selecting a Layer
- Home Scene > Select “Task / Read a Book” Layer
- Go to Home Scene. Select Task / Read a Book Layer from the Layer Panel, or select it directly from the Canvas Panel (the design view).
- We are going to use this layer as a Button to navigate to the Task Detail Page.
2 — Adding a Trigger to a Layer
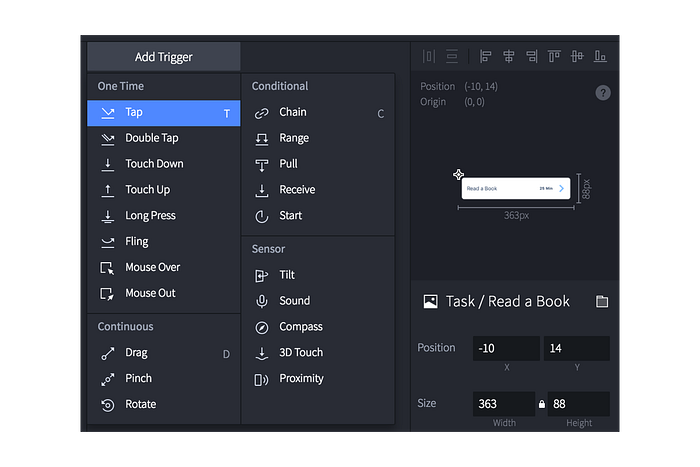
- Home Scene > Interaction Panel > Add Trigger > Tap
- Once you’ve selected the layer you can see its properties on the Interaction Panel — which is on the right side of the screen. This panel is used to control the interaction of the scenes.
- Tap on Add Trigger, and select Tap.
3 — Adding a Response and Modifying the Properties
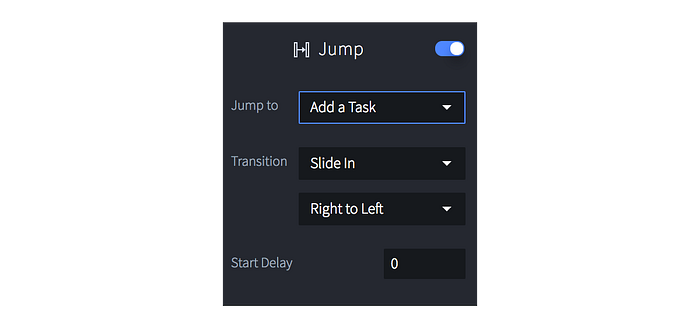
- Interaction Panel > Add Response > Jump > Slide in > Right to Left
- Once you added Tap trigger, there will be a small “+” icon below it. What the icon does, is to add a response to the parent trigger. Click on the “+” icon and select Jump.
- In the layer properties panel, there are 2 fields that you need to complete. On the “Jump to” field, select “Task Detail”.
- On the “Transition” field, select “Slide in”. Then choose “Right to Left”.
You have successfully created your first ProtoPie interaction. Try it out in the preview window. From the Home Scene, you can now tap on “Read a Book” card, and jump to the Task Detail Scene.
If you haven’t notice, once you’re in the Task Detail Scene, there is no way to go back to the Home Scene. Try it out yourself, use the Tap trigger and Jump response to make an interaction to go back to the Home Scene!
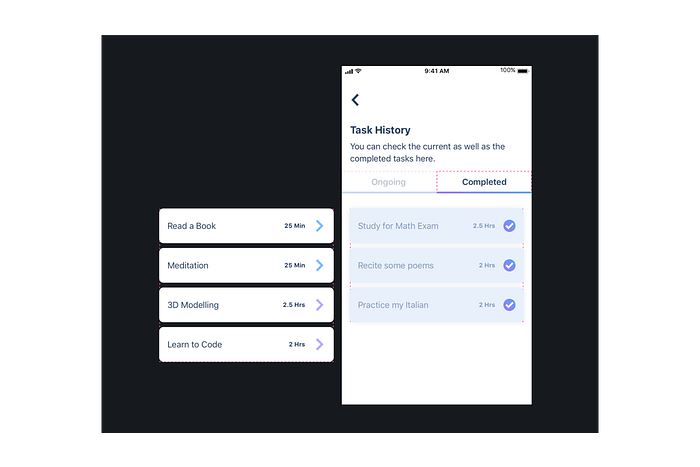
2. Tab Switching
We are going to create a simple tab switch interaction. There will be Active and Inactive button states, as well as some animated transitions between the content of the pages.
Here’s the final result:
- Object: Button, Container
- Trigger: Tap (one-time trigger), Chain (conditional trigger)
- Response: Move, Opacity
1 — Create a New Pie & Import from Sketch
- New Pie > Import from Sketch > Ongoing Task
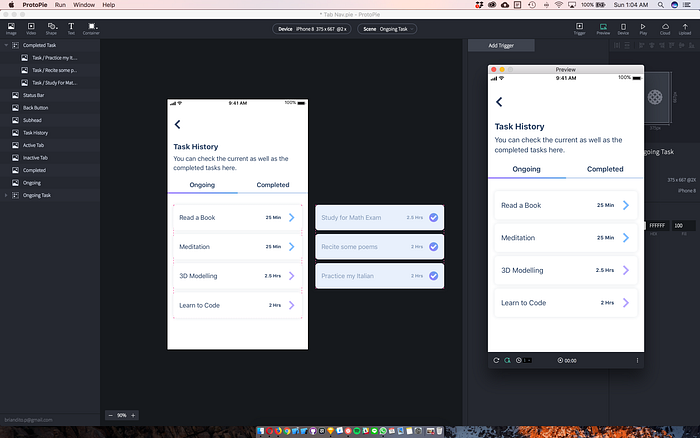
- Create a new Pie, import “Task History” from Sketch, and rename the Scene to “Task History”.
2 — Importing Another View of the Page
- Import from Sketch > Completed Task
- We want to import another view of Task History page. This time, we don’t need to add a new Scene. Import “Completed Task” from Sketch to the current “Task History” Scene.
- Once you imported “Completed Task”, you will see a group called “Completed Task” in the layer panel. In ProtoPie, Groups in Sketch will be imported as a Container.
- For now, let’s hide the Container layer away. Move the X position to 390, so that it won’t be seen in the Preview.
3 — Creating a “Button” for the Tabs
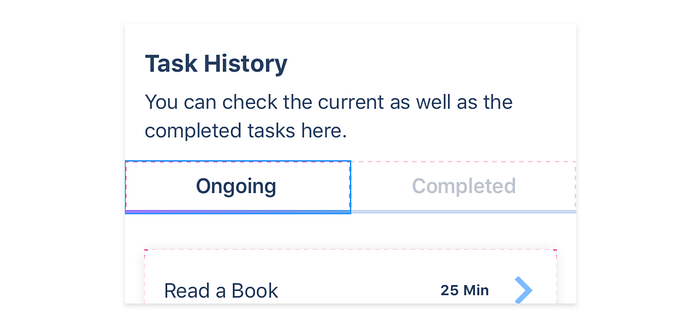
- If you select the “Ongoing” or “Completed” Layers, you would see a blue outline around the text which indicates the size of the layer. The size of a layer is equal to the size of the touch area.
- Unfortunately, both of the “Ongoing” and “Completed” Layers are too small to be tappable.
- That is why we are going to put each of those texts inside of a container, and make the touch area for these tabs bigger.
- Select “Ongoing” Layer > Add Container (shortcut N) > Resize Width: 187.5, Height: 44 > Move it to the Ongoing tab.
- Now we have a button-sized Container. Let’s put “Ongoing” Layer inside of the Container we just add and rename the Container to “Ongoing Tab”.
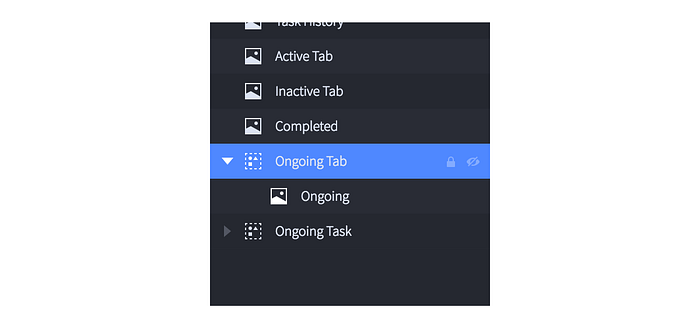
- We’d want to do the same with the “Completed” Layer. Make a button-sized Container, and put the Layer inside of it. Rename the Container to “Completed Tab”
4 —Making the Active & Inactive Tab State
- We need to make the inactive state for the Completed Tab. Let’s make the Completed tab a little bit lighter in color.
- Select Completed Tab > Change Opacity to 30
- Now we have an “Active” Ongoing Tab and an “Inactive “ Completed Tab.
5 — Changing the State of the Tab
Now let’s breakdown the Responses. When we Trigger a Tap, we want to:
1. Completed Tab Opacity > Change to 100,
2. Ongoing Tab Opacity > Change to 30,
3. Active Tab Indicator Position > slide to the right.
- Let’s start from number 1: Change Opacity of Completed Tab. Select Completed Tab > Add Trigger > Tap > Add Response > Opacity > Select Completed Tab > Change to 100.
- The purpose of this Trigger & Response is to change the Opacity of Completed Tab to 100 when it is tapped. Thus, changing the state from “Inactive” to “Active”.
- Once the Completed Tab is “Active”, we need to do the opposite for the Ongoing Tab. From the same Tap Trigger > Add Response > Opacity > Select Ongoing Tab > Change to 30.
- Now, it’s time to animate the Active Tab Indicator Layer. Before changing a property of a Layer, it’s best to change the Origin to the center of the item. So that whatever changes we made, will be based on the center of the Layer.

- Next, we’re going to move the Active Tab Indicator layer to the right. Approximately, we want to change the X position to 281. From the same Tap Trigger > Add Response > Move > Select Active Indicator > Change X to 281.
- Look at the end result, we’re almost done! Next, we just need to switch between the content of the tabs.
6 — Switching the Content of the Tab
- What we are aiming to do is — To move Completed Task Container to the middle of the page, and move Ongoing Task Container to the left. Refer to the image below:
- First, let’s change both of their Origin to the center.
- Then, Add Trigger > Chain > Select Completed Tab > Property Opacity
- Chain is a Conditional Trigger. Quoted from the documentation of ProtoPie, it is “An action where the changes of a property of one layer changes the property of another layer.” — IF layer X is changed, THEN layer Y will be triggered.
- So, what we are doing is essentially: detect IF the Opacity of Completed Tab is changed, THEN something will be triggered.
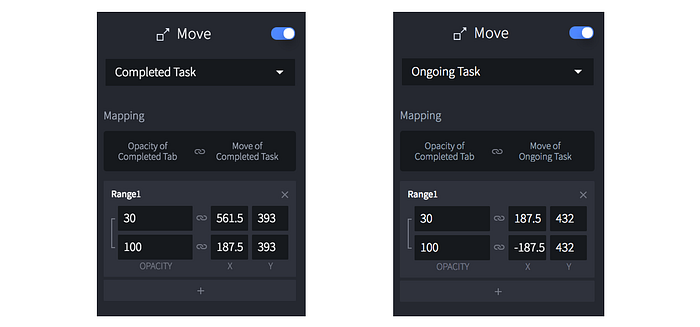
- Now that we have added a Chain, time to add some responses. Add New Response > Move > Select Completed Task. Once you’ve added the Move response, you will notice a difference in the properties panel. There are “Mapping” and “Range” instead of the simple Move X & Y.
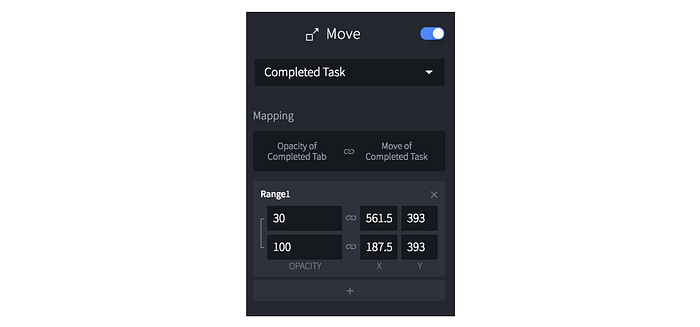
- Mapping, is the connection between the chain & the response. In the above example IF the Opacity of Completed Tab is changed to 30, THEN change value of x=561.5 & y=393.
- The second one means: IF the Opacity of Completed Tab is changed to 100, THEN change value of x=187.5 & y=393
- Now what we have to do is to add another Response for the Ongoing task, and hide it to the left. Add New Response > Move > Select Ongoing Task.
- Set the Move properties to look like this:
- Check out the end result. You realize that once we went to the Completed Task, we can’t go back to the Ongoing Tab. Now, we only need to do the opposite for the Ongoing Tab!

7 — Going Back to the Ongoing Tab
- To go back to the Ongoing Tab, we need to do the same thing we did to the Completed Tab. We will go through it only briefly, since the topic has been covered above.
- Select Ongoing Tab > Add Trigger > Tap > Add Response > Opacity > Select Ongoing Tab > Change to 100.
- From the same Tap Trigger > Add Response > Opacity > Select Completed Tab > Change to 30.
- From the same Tap Trigger > Add Response > Move > Select Active Indicator > Change X to 94.
- You don’t need to add another Chain trigger, because we have set the Chain Mapping based on the Opacity change of Completed Tab. Thus, we only need to change the Tab button state.
Conclusion
You now have a fully working Tab Switch prototype. You can actually explore more and extend this Tab Switch prototype even more; using swipe gesture to switch Tabs. Tip: It can be done using the Paging Container.
By following this article, you have learned about some of the most essential features of ProtoPie, such as the Chain Conditional Trigger.
If you have any questions or want to start a discussion, just leave a comment below. I hope you find this article useful, and thanks for reading!