Redesigning Unacademy’s Internal Educator Dashboard — UI/UX Case Study
In this article, I’m going to talk about my learnings about designing a complex dashboard.
Now before we get started, I’d like to do a super small plug to one of my highly requested courses!
It’s Free! The Mega Product Design Course for Beginners!
If you’re looking to drastically upskill and change your career trajectory for the better, make sure to check out my Mega Product Design Course for beginners on my YouTube Channel.
I’ve had the good fortune of working with some of the biggest companies and startups and have learned a lot through that. And I share all the knowledge with you all for free on my YouTube Channel.
I cover everything from the core foundations of Product Design, UX Design and so much more. Get to see and learn what it takes to be a skillful product designer which can get you any opportunity you want.

Anyway, let’s get into the case study!
About the project
I was one of the initial product designers to join Unacademy and help the company grow to a massive scale in a span of 1.5 years while I was there.
I’ve worked on a lot of projects and a wide variety of projects. A few small ones, a few big ones, and a few massive ones. In this case study, I am going to talk about one of my massive projects which also happens to be one of my favorite ones. I was the sole designer who owned this project and worked on it from start to finish. But I did collaborate with a lot of other people for this project.
- Product Managers: To understand the whole scope of the project and its requirements. There were a lot of new things we were introducing like the dashboard and revamping a few of the existing flows such as the schedule and database.
- Senior Designers and stakeholders: To get timely feedback on my designs and the design direction.
- Engineers: To ensure that the final output matched the design exactly.
About the company
Unacademy is an online learning platform where students in India can study for various competitive exams such as UPSE, IIT JEE, NEET, Banking, CA, and more.
The company hires educators who teach the classes LIVE and students can watch them at their own convenience. Students have to pay a subscription fee to access all the content the platform offers. Similar to Skillshare and Netflix.
The Internal Educator Dashboard
As the company grew, the number of educators and students on the platform grew as well. Each educator had a time table to follow, courses to create and manage. Now, the company did have an internal portal to manage this. But it was completely outdated and not great in terms of functionality. I mean, you know how internal tools are right 😛
Hence, we decided to revamp the entire portal from the ground up. We had also introduced a new design language for the entire platform called Whiteboard. It made sense to give the portal a visual upgrade as well.
I’d love to show you my Figma file but I am not allowed to do that 🙈
So let’s get started 🚀
Page Structure
So the product manager provided me with the requirements of the various pages that the portal should have and any new additions. Here is how the page structure looked.
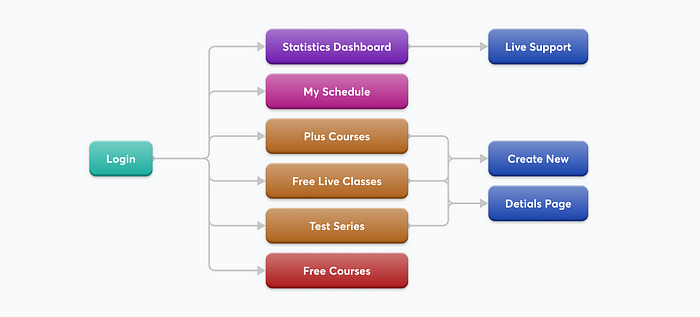
Statistics Dashboard
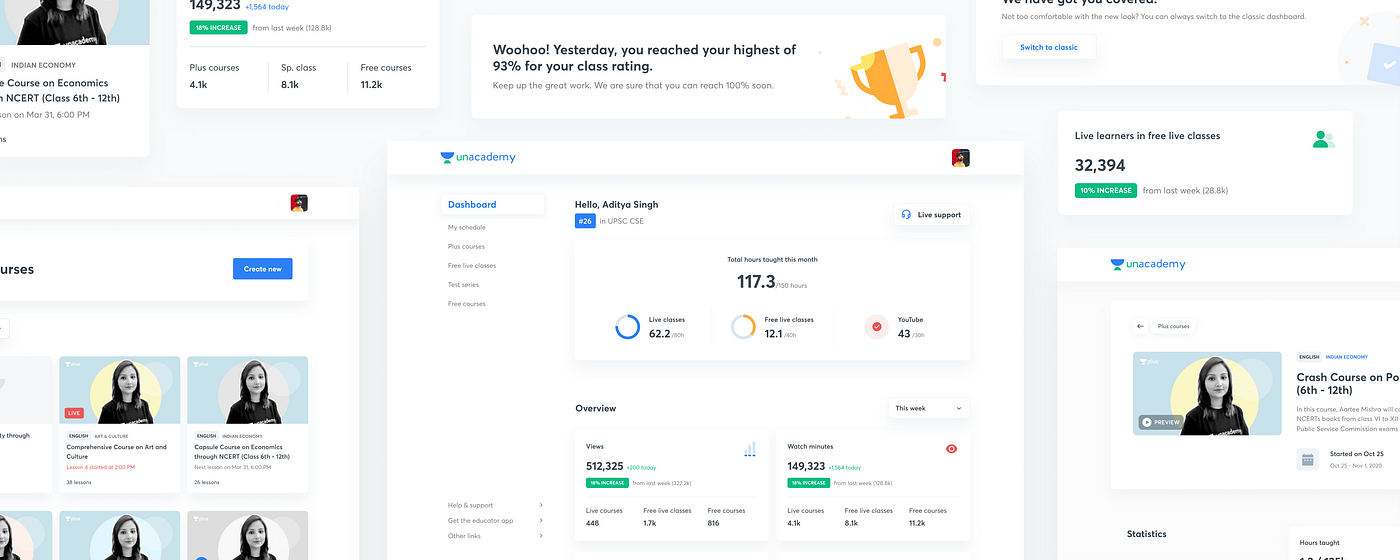
The first thing on the list was to create a new statistics dashboard that would give insights about the performance of the educator’s courses for the educator. This dashboard did not exist earlier.
Right at the beginning, I knew how I wanted the dashboard to look. Big blocks of content, large texts, and an appropriate amount of color. The design was quite simple and did not need a lot of iterations. Identifying what content to show was the tricky part.

So let’s break this down one by one.
- On the left, we have 6 tabs that take us to the various pages of the portal.
- Each educator is given a target of teaching minutes that they have to meet. This can be either on YouTube or Live classes (Free and paid for students) on the platform. For an educator, this is the most important information as the revenue and incentive they earn, depends on achieving these targets. Educators would want to know the progress of their teaching minutes.
- Next, we have a general overview section that has the top 5 metrics that an educator often is keeping track of. And these have been ordered based on the metric’s importance rank.
- Included a filter since the information can be viewed for a week, month, or lifetime.
Let’s look at one of these cards a little deeper.
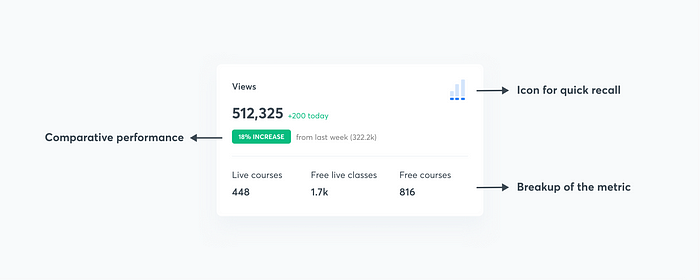
I wanted the card to be as valuable and informative as possible. It should help the educator make any decision he needs to just by looking at this card.
- Every card has a different icon for quick recall of the metric. He does not have to read the text to identify what the metric is.
- The metric shows a breakup of various sources contributing to the overall number.
- Information such as percentage increase/decrease lets the educator know if there is an improvement or not.

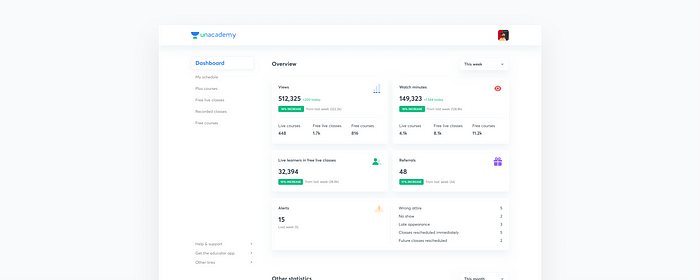
Next, we have a few general statistics and metrics. These were very direct and to the point. Nothing much to talk about them.
But one thing to note is that this page has 2 filters. The reason is that for this set of metrics there was only monthly and lifetime data. And not weekly data like the core metrics.
So two filters for a single page? That’s weird!
It does sound weird but does not feel weird on a functionality level.
How so?
Because all the iterations I tried to fix this problem make the UX feel even weirder. Haha.
Here are a few of the concepts I came up with to solve this problem.
Solution 1
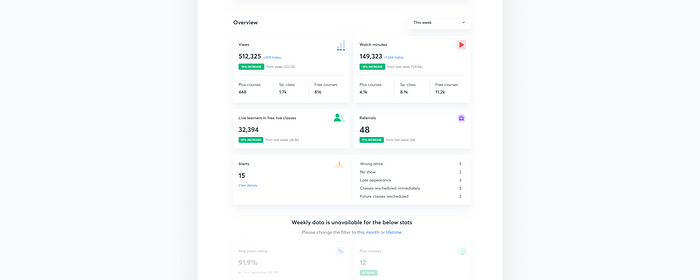
Since the second set of metrics did not have weekly data, I de-emphasized it and added an informative text to tell the user that only monthly and lifetime data was available.
But this felt quite robotic and complicated. It involved a lot of clicks.
Solution 2
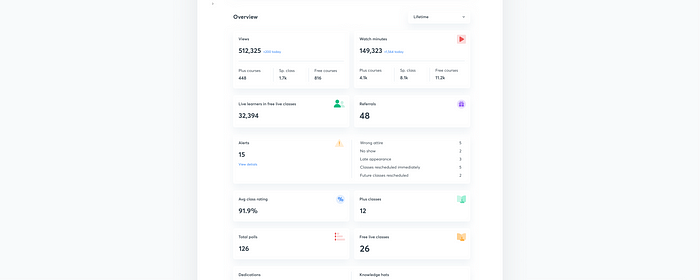
The next solution was to combine the two sets of metrics when the filter was changed to Monthly or Lifetime. But would split when changed to weekly.
This meant the UI would jump around and the user would not know why the UI was jumping. It would confuse the user.
Solution 3
Another solution was to automatically change both the filters to be the same if the user selected Monthly or Lifetime.
This would mean that the user has no control over the UI and that’s never a good UX.
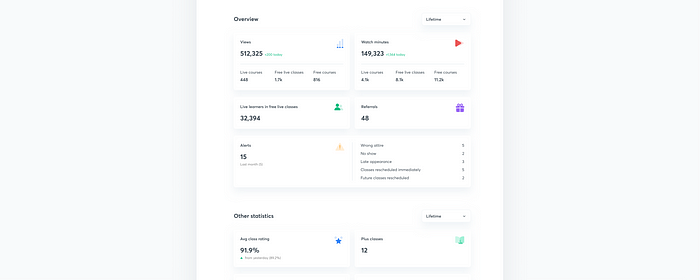
The Final Solution
So the optimal solution which is usually the simplest one was to make the core metrics change based on its own filter. And the other metrics would change based on its own filter. That way,
- The user would have complete control over the UI.
- Nothing would be jumping around.
- And no unnecessary clicks.
Dashboard Banners
The dashboard was already informative. But I went a step further. Dashboards are also used for proving the most relevant and timely information.
So I created Dynamic Banners.
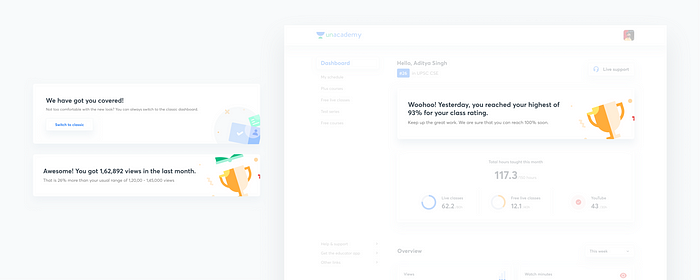
The plug-and-play banners were perfect for educators. Informing the user of key improvements, alerts, or anything that needed to grab their attention could be done using these banners.
Quick shoutout to Deepti Pareek who worked on the Illustrations.
Anyway, now let’s move on to the next page.
My Schedule
This is the educator’s timetable. It shows all the classes the educator has to take the present day, week, and the upcoming month. Quite simple.
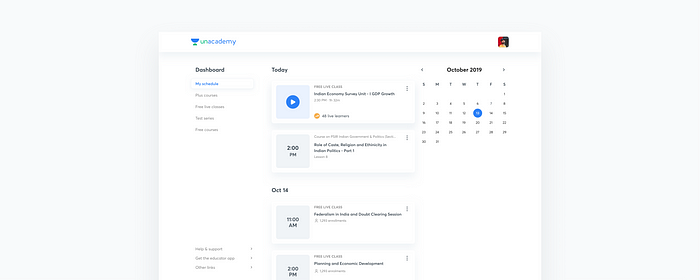
The structure is very simple and straightforward. It has a calendar on the right and the list of lessons scheduled on the left.
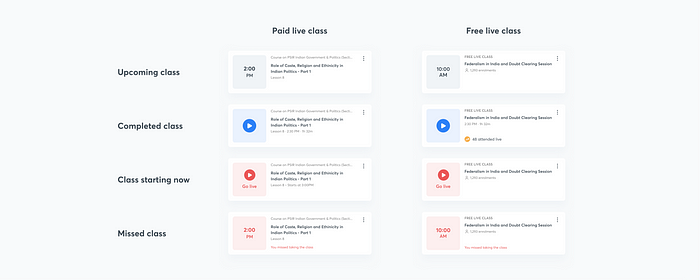
Each of these cards is individual lessons of a course. But there are also individual single classes that are not a part of any course. They are called Free Live Classes. These are available for free to watch even if you don’t have a subscription. Since the most important information to the educator was the time he has to take the lesson, I put that out right in front ensuring good information architecture.
I had to design a lot of states for each card. Here they are.
Courses/Test Series Page
The next page on the list was the list of courses and test series that the educator taught. A course is a group of lessons. A test series is a group of tests.
I am going to be showing the design only for the courses page as the design for the test series remains the same.
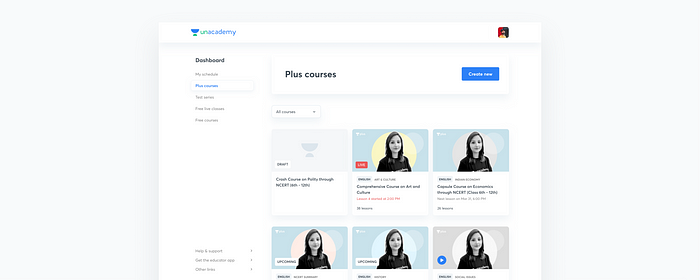
This page basically contains all the courses of the educator. And again, there are multiple states here.
There is a big CTA right on top for the user to quickly jump into a course creation flow if needed.
With regard to the order of showing these course cards,
- I decided to show the draft courses first to encourage the user to go and complete the course creation.
- Next is a course that has a lesson that the educator has to teach live.
- Then a course that has started but a lesson from that course is scheduled later in the week.
- Then a course that is upcoming. This means that the first lesson of that course is yet to start.
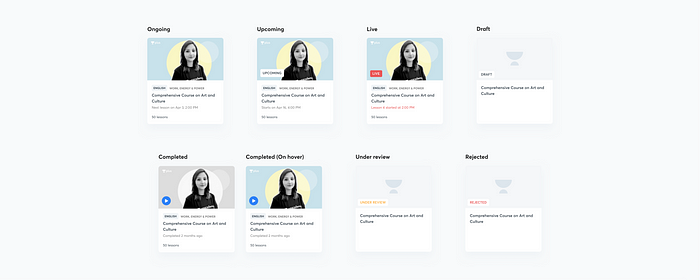
- And finally, in the end, I show completed courses.
And here are all the course cards in their wonderful glory.
Course/Test Series Details Page
The next page was the details page of the course or test series. This page contains all the lessons/tests and a few statistics to show the performance of the course/test series.
Let’s take a look.
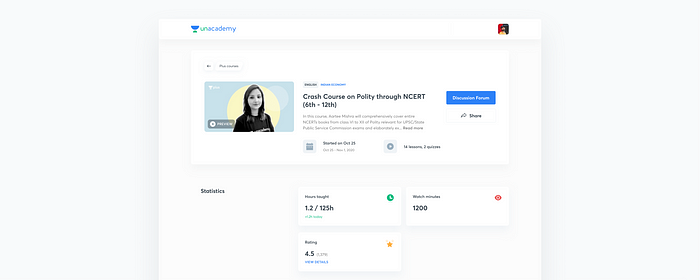
So we start off with a few basic details of the course. Nothing too fancy. Just regular things.
Then we have a few stats such as hours taught in that course, watch minutes of the students, and the course rating. Simple right?
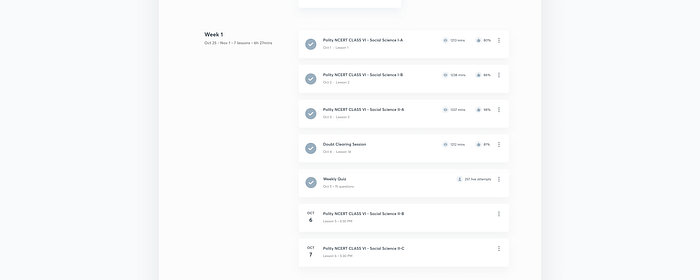
If we scroll down we get to see all the lessons of that course. As you can see, there are completed and upcoming lessons.
Each completed lesson has a few stats that share the performance of that lesson. The 5th one is an online test. Hence we decided to show the number of students who took up the test online. Simple things here as well.
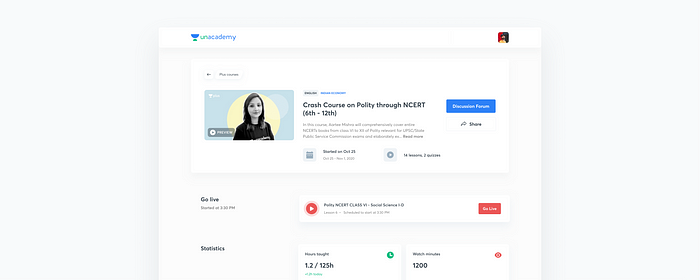
There is another card state, where we show the educator a card of his next class that is going to start in the next 15 mins right upfront. That way he can directly jump in and start teaching.
So that’s pretty much the main pages. Here are a few more extra ones.
A few extra things
Lesson details
Every completed lesson has a small details page, that mentions a few statistics and contains a few actions that the educator can perform.

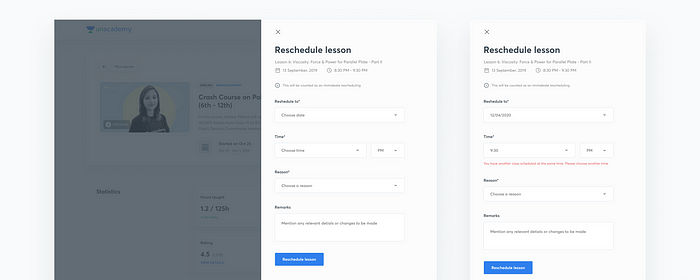
Lesson rescheduling
The educator has the option to reschedule the future lesson that has not been started yet. Here is how it looks along with a simple error state.
Time to retrospect!
So these were my learnings after working on this project.
- This was a big project. Lots of pages, user flows, and edge cases. It was my first time working on a dashboard so it was a very interesting thing for me to design.
- Since there was a lot of content on every screen ensuring good information architecture was little than I expected. But in the end with a lot of iterations and feedback, I was able to pull it off.
And… That’s a wrap!
I hope you guys found this case study useful and informative. Feel free to hit me up on any social media platform if you have any questions. I would be more than happy to have a chat with you.
🔥 Get 2 Free months of Skillshare Premium!
If you want to learn to build a fully functional website from scratch without using a single line of code in Webflow, make sure to check out my Mega Webflow Course for Beginners! You can find the course on Skillshare
Register with my link and get 2 free months of Skillshare Premium and watch it for free.

Check out my other articles on medium.
My socials
Portfolio | Instagram | Twitter | LinkedIn | Dribbble | Behance | YouTube

