
Product Design by Google — Part 3
Design Sprint
Ever felt that your design sprint needed a bit of brushing up or ever just wondered how to actually run a design sprint? This is Part 3 of the ‘Product Design by Google’ course notes. Part 3 focuses on teaching you how to run a design sprint, it teaches you how to perform the Google Design Sprint created by Google Ventures which is exclusively taught in this course. The design sprint process is widely used by teams seeking to design, prototype, and test their product ideas with customers. Here you will learn how to run a sprint from Google’s leading Design Sprint Master who will take you through all the steps required to validate your ideas and build mockups of your product.

Background
For those who haven’t seen Part 1 or 2 of this series, here is a little background info. If you have seen them, then skip this section. This article is essentially notes that are similar to CliffsNotes or SparkNotes. Remember those in high school? They were the timesavers and lifesavers, they were the cram plan the night before a big test. I’ve written these for the ‘Product Design by Google’ course that I recently undertook. The course consists of 129 lectures and exercises and it’s estimated to take about 2 months to complete.
Initially I wrote these notes for myself to help retain everything I’ve learnt but thought I’d kill two birds with one stone by learning, as well as, sharing this information with other fellow designers or people in general who are interested in the product design field. These notes are for those of you who may feel overwhelmed by all the UI and UX software and processes out there and would like a little less noise and want to drill down to the best practices. Who better to learn from but from Google who are one of the best in their field. These notes are also useful if you don’t have the time to do the course and would like a bit of a rundown. It would take approximately 1(+-) hour to read all 4 parts which is well less than 2 months to do the course. That’s almost as fast as Neo learns Kung-fu in the Matrix.

Alternatively, if you have completed the course these notes might come in handy to help you remember what you’ve learnt and would save you a lot of time backtracking to 129 lectures. The ‘Product Design by Google’ is a great course and I highly recommend trying it out. You can enrol for free via Udacity which it’s an educational organisation that was founded by Sebastian Thrun founder of GoogleX and David Stavens an entrepreneur, and scientist who’s in the field of robotics, machine learning and artificial intelligence.
Summary
(skip the Summary if you have seen Part 1 or 2)
The ‘Product Design by Google’ course basically covers Silicon Valley startups best practices & frameworks used for product design. It teaches how to perform Google Design Sprint (developed at Google Ventures and exclusively taught in this course) to design, prototype and test your ideas. In addition, it covers how to design lo-fidelity mockups for products and capture appropriate metrics.
In the lectures you will hear from industry experts in the field which include:
Instructors:
Amir Shevat — VP Developer Experience at Twitch and was the former Developer Relations Program Manager at Google
Chris Saden — Full Stack Software Engineer at Udacity
Industry Professionals:
Jen Kozenski Devins — UX Designer Google Apps Accessibility
Nadya Direkova — Senior Designer at Google X
Richard Fulcher — Head of Google Material UX and Engineering
Tomer Sharon — Senior UX Researcher at Google
Aaron Harris — Partner of Y Combinator
Pete Koomen — Co-founder, CTO of Optimizely
Nir Eyal — Author on works related to behavioural economics, neuroscience and consumer psychology
Yunha Kim — Founder of Locket
Kaushik Pendurthi — Founder of Locket
Harpinder Singh — Partner Innovation Endeavors
Syllabus
(skip the Syllabus if you have seen Part 1 or 2)
The course is broken into four parts which include:
1) Ideation and Validation
Develop, validate and refine your ideas to ensure you’re building for product/market fit. Through case studies and interviews with founders, product experts, and investors, you will learn how to efficiently conduct user research and build an entrepreneurial mindset.
2) UX and UI
This part takes you beyond visual style to understand material design, building for accessibility, user flows and personas. You’ll hear about how startups make design decisions and learn from senior designers at Google on how they use design to emphasize the purpose of their products.
3) Design Sprint (*this medium article will focus on just this section)
Created by Google Ventures, the Design Sprint Process is widely used by teams seeking to design, prototype, and test their ideas with customers. In this part, Google’s leading Design Sprint Master will take you through all the steps required to validate your ideas and build mockups of your product.
4) Key Metrics
In the final section, you will learn to identify common metrics for websites and apps relating to traffic, customer satisfaction, and engagement. You will learn tools that can be used to monitor metrics and examples from startups on what metrics not to measure.

Design Sprint
The ‘Design Sprint’ part of the course will tackle the following topics:
· Overview of a Design Sprint
· Planning
· Innovation Team Structure
· Overview of the 6 Stages of Designing the Challenge
· Stage 1 — Understand
· Stage 2— Define
· Stage 3— Diverge
· Structure of a Design Sprint Activity
· Stage 4— Decide
· Stage 5— Prototype
· Stage 6— Validate
· Advice for Running Design Sprints
Overview of the Design Sprint
Google Ventures describes ‘The Design Sprint’ as “a five-day process for answering critical business questions through design, prototyping, and testing ideas with customers.” In the beginning you’ll hear from Chris Saden, Amir Shevat, Kaushik Pendurthi and Nadya Direkova who all give an overview of what a Design Sprint is.

The main takeaways for me during these interviews were:
Learnings from Chris
Chris Saden mentions a quote that really resonated with me. Chris mentions, “The founder of LinkedIn, Reid Hoffman, once said, if you’re not embarrassed by the first version of your product, you launched too late.” It’s a nice quote to remind you that your first version doesn’t need to be a masterpiece, don’t be too disheartened if you are still ironing out the kinks.
From experience, I’ve been in a few projects where there’s a lot of emphasise on the first release of the product to be perfect. So much time has been put into perfecting the product to the point that so much time has passed that users’ mindsets have changed and the product is no longer really relevant. Technology moves so fast and in some cases technology has changed so much during that time that the product quickly becomes outdated. Time is really of the essence at the beginning of creating a product.
Learnings from Amir
Amir makes a great point at the beginning of this part of the course by saying, “It can be nerve-wracking to test your product, but it’s also super important to learn quickly and keep iterating on your product.” Learning quickly and iteration is key to a design sprint.
Learnings from Kaushik
Kaushik is one of the founders of start-up ‘Locket’ talks about the importance of incorporating the user every step of the way when developing a product. Kaushik talks about the importance of testing with users that are relevant to the specific application and to try to tailor the UI and come up with features that would suit users tastes and how they would use the application.
Learnings from Nadya
Nadya talks about how Design Sprints are very important in Google and they “have become a powerful movement that helps product teams at Google, our developers and companies in the industry, solve design problems quickly.” There was a fair few takeaways from Nadya’s overview of a design sprint which include:
- A design sprint always starts in the planning stage which is the most important one. The design sprint is run by a sprint master who can be virtually anyone in the team. “This could be the PM on your team, or this could be your CEO, this could be the designer, or it could be you, regardless of whatever role you play.”
- The role of the sprint master is first to identify the challenge that the team should be solving. If that is not clear, it’s very hard for anyone to make progress. Second, the role of the sprint master is to assemble the team. “We want to invite all the right talent, and that’s the most important part. If you don’t have a team, the sprint doesn’t really happen.”
- At Google the next stage after planning is ‘designing the challenge’ and in order to do this they start with 6 problem-solving ways of attacking this challenge. The 6 stages include:
1. Understand
2. Define
3. Diverge
4. Decide
5. Prototype
6. Validate
The Google Ventures Design Sprint link below is extremely useful if you would like a more practical how-to guide for sprints. There is also a book by Jake Knapp a design partner at Google Ventures and bestseller author of the New York Times which can be found in this link.
Another useful link is Google Design Sprint Kit which is an open-source resource for design leaders, product owners, developers or anyone who is learning about or running Design Sprints. Whether you are new to Design Sprints and gaining buy in for your first Sprint, or an experienced Sprint facilitator looking for new methods, this site will help you learn, plan, and contribute to the Design Sprint Methodology.
Planning
In this section Chris goes into detail on how to plan for a design sprint:
- The planning stage is really the job of the Sprint Master but it can be done by anyone within the team if there is no Sprint Master involved. “It’s the Sprint Master’s job to plan the activities that you’re going to do before, during and after the sprint.”
- “First, you should know that you’re going to do a lot of work up front. In general, you want to spend about one day of planning for each day of the design sprint. Good planning will help you run a smooth design sprint and let you solve your design challenge quickly.”
- Before the design sprint, you’ll want to write a design brief. This will let you define your design challenge and then it will also let you set a timeline for when you want to launch or when you want this deliverable, whatever it is in the design sprint to be reviewed.
- Before the sprint, you’ll also want to invite team members or talent to the sprint.
- The key part of a design sprint is user testing. You need to schedule when users will take a look at whatever you design from the design sprint. The user testing will keep you accountable, validate product ideas and push you and perhaps your team toward showing users something by the end of the design sprint.
- Before the sprint, you’ll also want to schedule any lightning talks. Lightning talks are conversations and collaboration with stakeholders, designers, engineers and users.
- You want to prep the slide deck that you’ll use in the sprint and leave room for special materials.
Chris goes into detail the tasks that you’ll need to do during a design sprint:
- If you’re working alone, you won’t need to do daily check ins and daily summaries, instead you should keep a master list of all the tasks you need to get done, so that way you can stay organized.
- You should also write reflections after each day, so you can look back on them and get better at planning and designing the sprints alone or with a team.
- One of the hardest parts about conducting a design sprint is facilitating conversation and resolving conflict among your teammates should they arise. Now you won’t really need to worry about this if you’re working alone, but you will need to be the point person or appoint someone else to resolve any conflicts when they do arise.
- After the design sprint, you should take the lead to summarize the results and plan next steps.
- If you worked with a team, you’ll want to send out a short survey to ask your teammates about how the design sprint went and what could go better next time.
- If you’re working solo, then you should just reflect on what happened and how you might improve in the future.
Innovative Team Structures
Teams in Parallel
When you have a large group, you might consider using the “teams in parallel” method. This means that you can have 2 or 20 teams working in the same week and coming together for key moments of the sprint.
This method requires advance planning:
1. Create team roles to ensure teams have similar talent, list the key roles required to solve the problem and work to staff each team.
2. Decide if teams will work on the same challenge or different challenges.
3. Schedule peer-review sessions when teams visit each other to get feedback. Design Sprints at Scale
24 Hour Global Relay Team
This might be relevant for teams that work on short challenges across different time zones. You can start the sprint in one office A and hand off the results to team B in another time zone.
Create a timeline that allows each global team in each office to start and hand-off their work in sequence. Consider how teams can build on each other’s work.
Sample schedule
- 2 hour sprint in Japan.
- 2 hour sprint in London.
- 2 hour sprint in New York.
- 2 hour sprint in Mountain View.
Overview of the 6 stages of Designing the Challenge
There are six stages or modes of a design sprint. And each of these stages solves an important part of the design process.

Stage 1 — Understand
The first phase is the understand phase. In this phase, you’re trying to get clarity on the business goals, the problem you’re solving for, technical feasibility, the market, and user needs.
Stage 2 — Define
The second stage is the define stage. In this stage, you might define the goal for the product or certain features. This might include the positioning, a user journey, or metrics related to the product or those certain features.
Stage 3 — Diverge
The third stage is the diverge stage. In this stage, you want to create as many solutions as you can to the original design challenge. And this is the stage where you really get to unleash your creativity.
Stage 4 — Decide
The fourth stage is the decide stage, and in this stage, you really just want to deliberate about the ideas that you came up with in the previous diverge stage, refine those, and then choose the best one or some combination of the ideas so that way you get a best possible product.
Stage 5 — Prototype
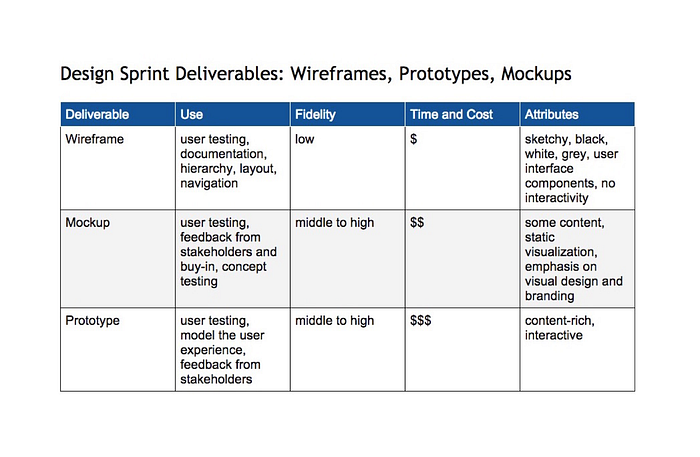
The fifth stage is the prototyping stage. In this stage, you want to actually create and build the wireframes, the mockups, or the prototypes that you’ll actually test with real users. These are the deliverables of the design sprint.
Stage 6 — Validate
And finally, the last stage is the validation stage. In this stage, you really want to test your products with real users. You’re testing your wireframes, your mockups, or your prototypes, to determine whether or not the hypotheses, or your risky assumptions are true. You’re trying to figure out whether or not you have the right product, and whether or not it’s usable.
Stage 1 — Understand
In this section of the course, Nadya goes into great detail explaining what the ‘Understand’ stage involves.
Business
“First, you want to understand the business goals. If you’re not making money, if you’re not responding to where the business needs to grow and to the culture that the business is promoting, then the solution might be the wrong one.”
Engineering
“Second, you want to understand engineering. The technologies, which makes the ideas come to life. So without understanding where the technology’s at and what the team is able to deliver, it kind of doesn’t matter.”
Users
“If there’s something that’s important in design solution, it is who it is for. The designers and the whole team need to understand who are the potential users and what are their needs?”
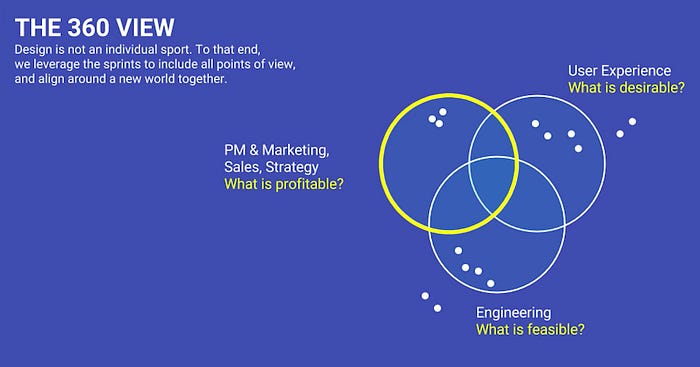
“When you circle problem in this manner and you look at it from all perspectives, business, technology, design, you’re creating a more holistic approach, so that the solutions have come from wisdom. That they’re not rushed, that they’re better targeted. I think in this stage, it’s important to hear different perspectives. If you are over focusing on one and not the other, you might have a solution that’s lopsided. So in the sprint, we try to be balanced in the beginning and hear from everyone who’ll be involved in making the product or who’ll be involved in approving it.
If you’re in a large company, this may be the director of the product and the director of engineering. They represent the business and the technology. Similarly, the user researchers or the marketing and sales teams. Now, if you’re in a startup, you might not have a person representing every single perspective. You could be the single person who represents everything. In a startup, you often are wearing all these different hats. So, it’s useful to consider and pause.”
Business
“Even if you’re one person or even if you are small team that doesn’t have diversified roles yet, what are the perspectives on this problem as looking in it froma business perspective, there’s one set of issues that they’re important. Those are about the metrics, the goals, the revenue.”
Engineering
“Looking in from a technology perspective, there’s another set of problems. That is generally, what is the code able to do? What are the features that are being developed? What’s available to outsource or what APIs are available to bring in?”
Users
“And then from a design perspective, it’s about what are the user needs that you want to address?
When you look at it from these three perspectives, even if you have a small team, you’re helping people stretch their minds. They’re really opening up, so that they can consider and not miss out on a good idea.”
Things that can go wrong in this stage
“Often, I see teams take a very long time in this stage. If the team doesn’t know each other well, this may be a rare opportunity for them to start talking to each other and they’re so excited to learn from each other that the stage can drag on and take two or three hours. The goal of the sprint is to understand, but then quickly move towards the other stages in which people are defining a strategy and starting to make things. So what could go wrong is the team can spend too long in this stage. So they could be circling around until they understand and never to get to an understanding.
Another thing that could go wrong, which is actually a chance for something to go right is that the challenge might be improperly defined. Sometimes people who are beginners in the art of being a sprint master, approach the challenge in a very specific way. And when they offer to the team, they learn that actually the team has a different need and there’s something else that’s more important to solve. That is a mistake that’s easier to correct in t he beginning of this program and not during this phase. But if a sprint leader finds themselves confronted with a team that says, we should be solving something else, it is a great opportunity to seek to understand. Open your ears and help your team agree on what is the right thing to do, quickly.”
Another thing that Nadya mentions is that during this stage, those who tend to be a lot more extroverted can sometimes try to dominate the conversation. It’s really important to make sure that everyone has equal opportunity to get their point of view across, the product ends up hurting when you only hear one perspective. Don’t underestimate the not so loud, as the late Mr Stephen Hawking nicely puts it, “Quiet people have the loudest minds.”
Understand Methods
In this section Chris describes methods that can help during the understand stage which include the following:
- 360 Lightning Talks
- User Interviews
- Visiting users in their field
- Stakeholder Map
- Competitive Overview
360 Lightning Talks
360 degree lightning talks are incredibly useful. The deliverable of the design sprint should meet the business goals, satisfy user needs and be possible with current or emerging technology. Lightning talks are meant to be a quick way to address those major concerns.
Here are the questions that should be addressed by anyone who gives these talks.
Business
For the business side, that person should be able to address:
- What’s profitable and sustainable for the business in the long run?
- And what are the current business needs?
Users
Anyone speaking to the user experience should be able to answer:
- what do people need?
- And what’s delightful or useful to the user?
Engineering
And finally, someone should be able to speak knowledgeably to technical concerns:
- What’s possible with today’s technology?
- Or what features can be built now or over time?
User Interviews
Now of any of these activities that you do, you should be sure to do user interviews. You want to talk to users at the beginning of the design sprint and at the end of the design sprint, so you can validate your work. User interviews allow you to understand the goals and the motivations of users, you might also try exploring some of their emotions and how they feel about existing products or about particular features that you want to implement. If you have existing designs, you can definitely ask a user about them. If not, you could always ask a user about a competitor’s design. The interview should follow a sort of arc like this.
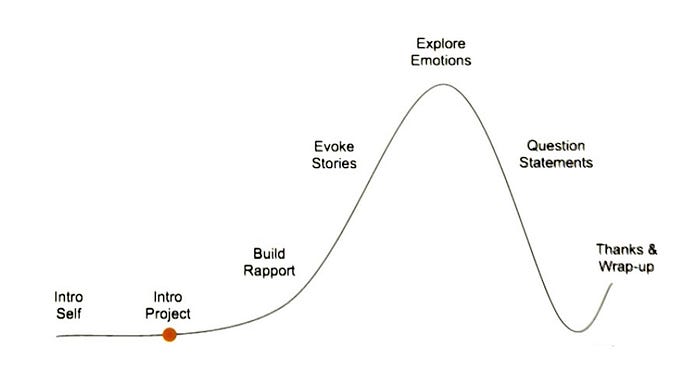
You want to get to know the interviewee at first, so make them feel comfortable and keep a conversational tone. You also want to be genuinely interested in the person, so you can ask them starter questions just to build rapport. Then you can plan your questions accordingly, so you can get out their own stories and the general moments in this arc diagram. Be sure to thank the user and wrap-up with any followup steps.
Visiting users in their field
If you don’t have any current user research, then you should definitely consider going to visit actual users. This would be a field visit. A field visit or field study will let you observe how consumers use similar products or you can take note of the context in which users use that product or service. You can also ask questions about their behaviors, they’re likes and interests and their pain points or problems. You might do usability testing with them, if you have current designs. Or you might competitor designs, if you don’t have current ones. Or finally, you might gather feedback on early ideas, copy for your website or app and particular features that users may want. This would just be concept testing.
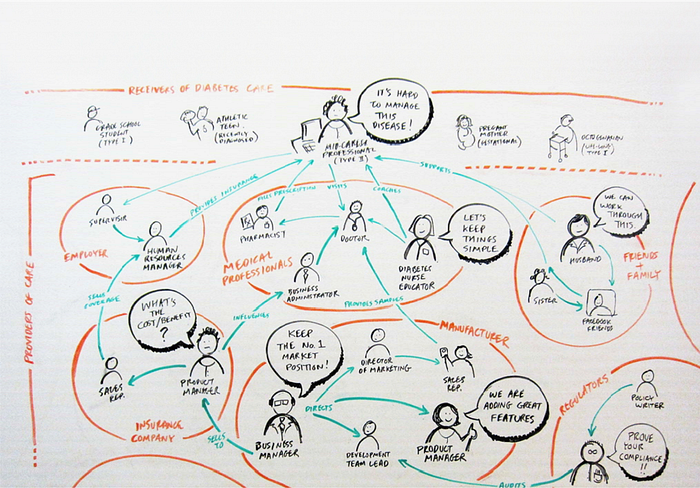
Stakeholder Map
A stakeholder map is another necessity that can help you think about all the players related to your business or your industry. A stakeholder map is a business tool that allows you to see a visual representation of a company’s various stakeholders such as individual and groups, their level of interest in the company and their importance.
Competitive Overview
This last activity is another great way to get perspective on the industry. You can check out competitor’s apps or websites to get a sense for what they’re doing. This can help you figure out what’s happening in your current space or industry. And you can also analyze, how’s your approach different from these others? Is it a subset of features or is it marketing efforts? You can also see particular UI elements or design elements and flows, that appeal to you and others that you might want to avoid.
Summarise Your Findings
Whatever methods you choose, you should make sure that you summarize your findings from the activities. These findings should be on your mind and on the minds of anyone on your team, as you go into the next stage of the design sprint.
Stage 2 — Define
So once you have a good understanding of the problem, you move to the define stage. The define stage is about finding a strategy and analyzing what is the best path to actually arrive at the solution. During this stage, all of the exercises that someone is familiar with around product strategy become very, very applicable.
Define Methods
User Journey
The define stage can be greatly enhanced if people pause to describe the user journey that they’re working to create for the user. A user journey is a storyboard that helps define the major pieces, step by step, of someone experiencing the product for the very first time when they don’t know anything about it.
You need to write who the user is and what do they do with the product. In some circumstances you might not know who the user is. In this case you just try to find is what is the most common path that someone will take from a perspective of not knowing anything and then from the perspective or being familiar with the product. Now within that, there may be other stories.
For example, if you’re working on an app that’s reviewing local restaurants, there may be one journey for people who are writing the reviews, and another journey for people who are reading the reviews. From those two, the most common path would be someone hearing about your app. So you look at it as how are people discovering your app.
After that, it’s about how are they starting to use it. That may mean that they download it, and then afterwards, they’re starting to search for restaurants, read about them, and then they get reminded after they’ve been somewhere potentially, that they need to write a review. The user journey has many names in the industry. Because design is a relatively new discipline in technology, there have been many different ways to refer to that. Some people refer to the user journey as a storyboard.
In fact, what we know from design history is that Disney was the first person to use storyboards. Disney had a team of artists and technologists who had to make the first animated movies before anyone knew how to make that. So in order to keep everybody on the same page, and not to waste money, he created the storyboard that said, moment after moment, what is happening to his characters. And that first storyboard, which was about the movie Snow White, helped organize his team, and set a precedent that teams continue to use today.
The Golden Path — The Central Story
So how to know you have enough stories in your user journey. Nadya mentions that it’s not important to have every possible path however, it is important that there is one central story that is the most important. “Another name for that is the ‘Golden Path’ the name actually comes from Microsoft. In Microsoft, or so the story goes, the teams refer to the golden path as the experience that is absolutely key for the product to work, for the users to come and get what they want. The Golden Path is supported by red threads. These are the little stories that help make it possible, and there can be many, many little thread such as the user sign in, potentially the shopping experience. But if the Golden Path is your discovery process then that’s what needs to be really easy, really key and all efforts in the company need to be focused there.
It is important to be clear of one most important user journey as it’s important to prioritize. If you don’t know what your app is going to be most commonly used for, then it’s really difficult to know how all the other things fall out. So, we recommend to always focus on one central user journey, and to make sure that it is easy and effortless for people to achieve that.”
Plan the Entire Journey
It’s important to plan for everything. Nadya mentions, “We see a lot of startups fail because they have created a great product but they don’t have any plan for how they’re going to be discovered. In that way, they’re building little islands in the ocean, and there’s no line there that will ever take passengers there. This is why we remind people, plan the entire journey. Plan your product in all of the different stages, from the time when no one knows about it, towards the time when they’re really masterful.”
Central User Journey
The central user journey is one activity that can help you break down ideas into meaningful categories. You can describe all the interactions that take a user from first hearing about the product to becoming an expert user. If you are improving an existing product, you need to analyze the current state of the product before creating a new user journey.

The Golden Path
The Golden Path are the key steps that a user takes to find the value they came to find in the first place. Don’t think in terms of web pages or screens; think in terms of stories. Prioritize the central flow versus secondary flows or paths.
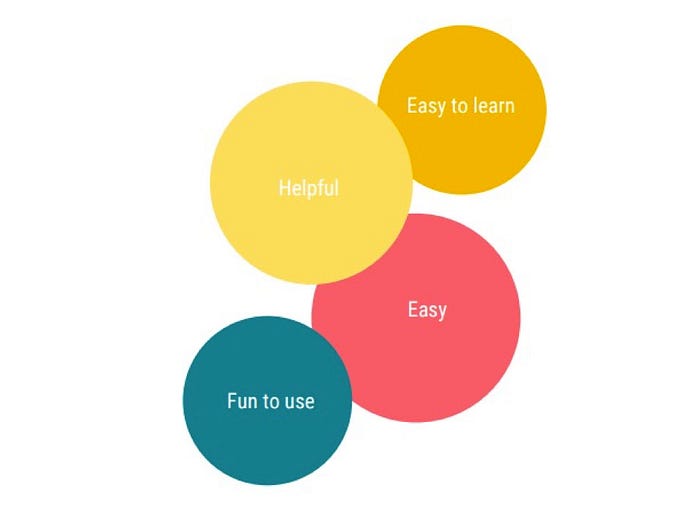
Defining Design Principles
What three words would you like users to say about your product? List all possible design principles and reactions your team cares about individually, and select the best ideas as a team.
Brand Visual Sliders
Use sliders to decide on the key visual and emotional qualities you want to express in a new product.

The Three Hypothesis Strategy
This simple activity can help you confirm the early formation of the product including the core audience, needs, and solution. You’ll answer three questions. Who is the user? What do they need? What is a solution?
The First Tweet
Imagine it’s time to launch your product. What is the first announcing tweet you would send out?
Job Flows
In this activity, you describe every user problem as a job, focusing on the event trigger, motivation, and outcome. It’s simple to formulate and powerful because it focuses on behavior and situation rather than user types.
Future Press Release
Write a press release that includes:
- title and subtitle
- problem statement and customer definition
- details of the product solution
- why this product (in your own voice)
- why customers love it (in their voice)
- how customers get started using it
Pay attention to the voice of the company and the customer voice.
Success Metrics and Signals
Do you know or does your team have agreed upon signals and success metrics? If yes, remind yourself or your team about these during the “understand stage”. If not, draft signals and success metrics. You’ll learn a process for doing this in Lesson 4 on Key Metrics. What’s the difference between signals and success metrics? Signals relate to the general presence of a behavior that is desirable. Metrics are quantifiable, numeric outputs with regards to the desired behavior.
Experience Strategy Template
This activity comes from the book, Crossing the Chasm and it’s geared toward new product categories. Fill out the template from your product, and bring together the best ideas to market the new product to a target audience.
1 Page Executive Summary
Answer a couple questions to arrive at a short and sweet product definition. The guiding questions for this activity were published by a former Google PM in the book, Shipping Greatness
Stage 3 — Diverge
The diverge stage is a chance for everyone to be thinking with their own creativity and imagination, how should this problem be solved. Here the whole team tries to think about many solutions. Everyone should be given time to individually to work on some solutions. Once they are ready with this, then they share it with the team. Speed in this stage is important. Nadya describes the exercise they perform at Google.
Diverge Methods
Crazy 8’s
“One thing that’s really exciting about this stage is how quickly it can happen. We do an exercise that’s familiar to some people from Gamestorming. It is called the Crazy 8’s. The Crazy 8’s everyone i given a little piece of paper. And they ask the team to sketcheight ideas in five minutes. Usually, the first reaction that people have when you ask them to sketch eight ideas in five minutes, is they think you’re crazy. And that’s why we call it the Crazy 8’s. In five minutes, people are able to do five, six, seven, sometimes eight ideas. That allows them to warm up their mind, their creative muscles are starting to flex. It’s kind of like a warmup for a workout. After that, we give the team another piece of paper and another five minutes and we say from the ideas that you already have can you give me one big sketch. Label it clearly and explain what are the pieces of this layout that you’re creating. Some people might be intimidated by the sketching process. This is when we remind them that we’re asking them to sketch simple things.”
1 Storyboard in 5 Minutes
Sometimes, product ideas are too complex to express on 1 page or screen. This is when you or your team need to think in terms of stories or flows. As another activity you can ask individuals or small groups on your team to sketch a storyboard of all the key steps the user must take. Think of this as a more detailed version of the Golden Path or the Central User Journey from the Understand Stage. In this activity you are identifying what the user sees and what the user does every step of the way. If your team is new to design, encourage them to think in terms of comic book strips.
Decision Sliders
Products are made of many decisions and assumptions. One great practice in the design sprint is to list the core decisions that affect the user experience. For example, you may need to decide whether a service is going to be free or paid? You might also need if the user will be picking up groceries in the case of the shopping app or not. List both options, and use slides to mark decisions: a, b or both. Decisions can be revised, of course, but changes in the sliders can alter design decisions. This chart can help remind people about what’s important for the user experience. Visualizing the decision space can lead to a deeper grasp of what the product should look like and how it can support users in their tasks.

Structuring of a Design Sprint Activity
It’s good to note that you should pay attention to the structure of most design sprint activity. Many of the activities have the following format.
Format
- intro the activity and deliverables
- work time for individuals
- sharing and discussion
- documenting and next steps
This format leverages the experiences and creativity of individuals so ideas can be crowd-sourced from the team. The best ideas are often a blend of ideas or come from multiple individuals. The individual work time also tries to prevent group think from happening. This format is useful for all stages of the design sprint so that individuals can contribute ideas throughout to shape the product.
You can work alone on your product, but you will likely come up with a better product by working with a small team. If you do work alone, then you should focus on considering the perspective of other people: users, investors, engineers, designers, business professionals, and other stakeholders. These perspectives will help you build a great product because products are made by people for people. It was mentioned that “Our best advice though is to work with others and seek feedback.” Working in a vacuum rarely leads to a great product.
The collaborative nature of the activities, however, does not mean that every decision should be reached by consensus. Ultimately, you (the entrepreneur or designer) are the decision maker or you have appointed someone to make critical decisions throughout any of the design sprint activities. Remember the objective of these tasks is for you to learn the process and the importance of “showing and not telling” so you can embed that in your thinking and problem solving.
Stage 4 — Decide
So when we have multiple solutions, it’s time to come up to a decision, and to come up with one solution. The decide stage is important in helping filter down the ideas that were collected.
Decide Methods
Zen Voting
Nadya explains in this section how to filter down the ideas. “The previous stage, which is about diverging, has made it so that everyone has created a lot of sketches, and they’re starting to develop some passion and attachment to the things that they have. During the design stage, we ask the team to put their ideas on the board so everyone can see them. At that point, we ask people to remain silent. We call this process Zen Voting.
Just like in a zen spirit, you want to be quiet and consider things in a reflective manner. During this process, we ask people to review what the sketches are before anyone gets to bias them with their opinions. So, as they review the sketches that other people have created, they start thinking, what do they like about the other solution. And you’re always curious. I made this. What did the others make? It’s fun to see that.
After everybody has voted, it is time to actually discuss things in person. People had individual, personal time to be creative. Then they have personal time to view results, and they have time to consider and cast their vote before anyone else could say. I think this is important. So now that they have gone through that, they’re ready to look at things as a community. As a community, the team reviews what are the ideas, what are the most popular ones and then quickly they get to see more clearly some things rise to the top and maybe others are less important. So there minds are changed based on what the community has decided.
Research shows that this community-based voting can be more powerful than the decisions of a single expert. Crowdsourcing a decision makes the team decide faster and it helps the team often gather the wisdom of everyone who is involved.”
Common things that can go wrong
“Decisions are a crucial aspect of what teams do. In fact, the life of a team is made of all of the decisions that they make. So we cannot pretend this is an easy process for teams. Things can go wrong if one person is trying to overpower and put opinions over others. This happens all the time. This is why we have a leader of a sprint. The leader of the sprint is watching the entire group. They want to make sure that the introverts and the extroverts are heard, the designers and the engineers, the CEO and the intern. Everyone could have a great decision at this point. So at this stage we look at the solutions, we vote, and we make a call.”
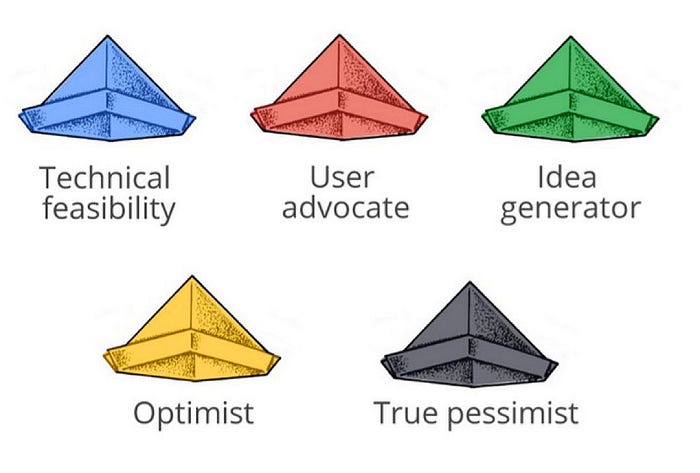
Thinking Hats
If your team is new or tends to be biased in their opinion, assign everyone a “thinking hat.” Each hat represents a different point of view that’s valuable and that can enrich the final decision. Encourage everyone to choose a perspective and discuss the decision from that point of view. If you are working alone, it’s likely that you are already thinking like an “idea generator” or an “optimist”. Change your thoughts to be in line with one of the following:
- Pessimist
- Engineer (technical feasibility)
- User advocate
Think of objections to your own ideas and how you can beat them.
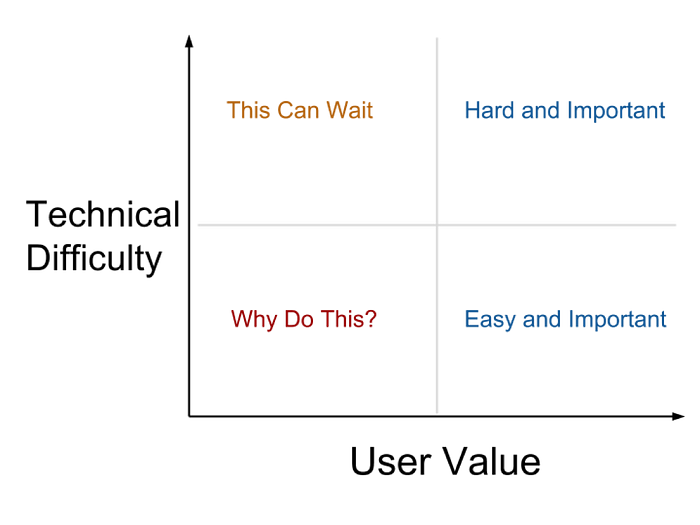
Technical Difficulty vs. User Value
Use this activity to organize ideas by difficulty and user value. Ideas that have little user value should be avoided, and if product launch timelines are short, then technically difficult ideas should be put on hold in favor of ideas with less technical difficulty and equal or greater user value.
Stage 5 — Prototype
Once we have decided on a solution we then move onto to prototyping. Prototyping is a wonderful way to test your ideas. Nadya points out that, “We want to make prototypes that are real enough to feel, so that we can test them with users, and that’s all that’s required.”
Low, Mid and High Fidelity
“Prototyping can take many forms. The simplest is to do a paper prototype where you can quickly gather feedback. One level up from that is to work on digital designs that are mid fidelity or high fidelity. The higher the fidelity the easier it is to test and to get feedback from users because they’re looking something that’s a little bit more polished.”
Physical
“A next level of prototyping is actually creating physical prototypes. When we work on something like Project Glass at Google or Project Moon, it’s not about software always, it’s about what does the physical device look like? So that’s when it’s useful to have materials that help you create a quick shape of a general idea.”
How-to Videos
“Other prioritizes we have made include video. In fact, if you try to explain the product to some one, creating a video is super, super useful. The little how to videos that a lot of companies use to describe their services are really useful in the design phase.”
Coded or Interactive Prototype
“If you make it straight on, even if it’s shot with a little mobile phone, and the users are the friends that you’re working with. That can be sufficient to explain the idea to a user, or to an investor, and to test it. If you want the high quality prototype, you need to spend longer developing it. I think coding a prototype is a great idea, so some people are able to really sprint, and within two days, start to already call the prototype. And then you can have an interactive demo. Or some people take maybe four or five days, depending on how complex the solution is.
So the duration of the prototyping phase is usually what determines the duration of the sprint. This is the key aspect in which actually the work is getting made. If you’re someone who loves to code, who loves to design, this is the phase that you really get to shine.
And if you’re looking for a low fidelity prototype, a short sprint, a few hours might be sufficient. If you want something that’s high fidelity, or requires a demo or a video, you’re better advised to have a whole week of the team’s time so you can make something beautiful.”
How do you know which type of Prototype to choose?
“What is the best? Okay, so, if you’re working on a new product, it’s probably best to shoot for medium fidelity. That means that you’re not looking at paper prototypes necessarily. You might have some early wire frames, and that you’re starting to put some color on them.
Or that you also use Keynote or a quick prototyping tool that your engineers know how to use in order to bring some life to the ideas. We believe in teams choosing their own prototyping tools. There’s a lot that’s available on the market, and the right ones are the ones our team loves to use. If you’re wondering where to start, Sketch is a really great example. So is Adobe Suite, although it does take a little bit of time to learn. And then Keynote and Google Sites are also really useful in prototyping quickly.”
Prototypes & Deliverables
A prototype is something that makes your ideas “real enough to feel,” so you can get feedback from users. You or your team will likely spend the most time in this stage. Because you have already scheduled user testing, the deadline will help keep you focused on making a prototype. Keep in mind that the output will likely be thrown away so don’t obsess about perfecting it. High-fidelity prototypes, those with fonts, logos images, and near pixel perfection, will require design talent and time so plan accordingly.
Here are the types of deliverable you can make:
- wireframes
- mockups
- prototypes
- physical prototype (paper, Legos, office supplies, etc.) video (i.e. Dropbox)
What’s the difference between a wireframe, mockup, and prototype?
Articles and Blog Posts
- 5 Prototyping Tips That Will Improve Your Process
- Prototyping Tools and Process
- 10 tips on prototyping UIs with Sketch
Tools (Rapid Prototyping Tools)
There are many tools you can user to create user flows, low resolution wireframes, and mid to high fidelity mockups. Here are a list of some tools.
Remember that tools will change, and you can always make use of paper, pens, pencils, sharpees, crayons, and markers. Paper is great because you are less likely to perfect details and less likely to grow attached to the designs. It’s often helpful to know that you won’t keep anything on paper before you start so that you can focus on ideas rather than pixel perfection.
User Flows and Low Resolution Wireframes
prezi
wireframe.cc
pencilproject
wireframesketcher
ninjamock
Low Fidelity Prototyping Tools
Balsamiq(free trial)
Invision (free forever)
Keynote (iOS animations)
Google Slides
High Fidelity Prototyping Tools
Stage 6 — Validate
Once we have a prototype, the next stage is validation. The validation stage answers the hardest question in product design. The hardest question in product design is how do you know if your work is any good? How we answer this question has three different stages.
Triple Validation
At Google they use something that they call ‘triple validation’. Just like in the beginning we looked at a problem from the perspective of business, technology, and users, at the end we want to validate the solution from the same three touch points. The most important opinion, and the most important votes and validation, is that of the users. So the critical piece not to miss is the opportunity to test your prototype with your users. At Google they recommend sprint master to recruit users from the very beginning of the sprint, so they know that, at the end, the users are coming. They have to prepare for it, and else, all the efforts that they have spent in prototyping could go to waste because they don’t actually know if this is solving the needs the users have.
Usability Testing
So meeting the users at the beginning is useful to learn their needs, and meeting them at the end is crucial in order to test. This type of test is called usability test or Cognitive Walkthrough. It allows you to put the products or the early prototype in the hands of a user and watch them walkthrough all the different stages.
Find out:
- What do they like?
- Where do they get stuck?
- Do they understand what the idea is about?
- Do I need to explain tothe user what he needs to do?
Nadya points out, “What we like to do in this stage is kind of like it’s based on one of the ideas of writing, show, don’t tell. A great design prototype should be able to stand on its own without too much explaining. Generally we’d like to set up the user and say, imagine you’re shopping for a new product, or imagine you’re looking to write the review, and now tell me what you see, and now tell me what you’re doing from here. So we ask the users questions, and ask them to imagine themselves solving a specific scenario, and we watch what they do. We ask them questions to clarify, but we’re not trying to sell the product to them.
One of the mistakes that people make in this stage is that they imagine this is a marketing pitch and they start explaining how awesome the product is, or why they love the idea. This is a useful approach if you’re trying to recruit that specific person to buy your product and they might, just because they’re trying to be nice. But this approach does not answer the critical question, is the product any good?”
User testing is critical to determine if you are building the right thing for users. A simple user test can uncover valuable insights, and you can perform user testing over a video call or in person. It’s important that you are able to see what the user is doing and how they interact with the prototype. For more information on how to conduct usability testing (including examples of a usability script, consent form, checklist, and demo), visit Rocket Surgery Made Easy.
During the usability testing, observers should take notes (post-its, Google Doc, paper) or document feedback in a rainbow spreadsheet as Tomer mentioned in Lesson 2.
Observers should capture answers to the following questions.
- What do users like and dislike in the prototype?
- What would they like to improve?
- What features did they want?
- Does the solution meet their needs overall?
- How would they describe the product? (You might ask for only three words which can help with marketing or validate decisions made in the sprint.)
Building Better Products through Prototype Validation (Invision Blog)
Kano Method
Kano is used to measure potential user satisfaction with new or proposed features. Participants are shown feature concepts with a short text description, and then asked to rate two questions.
- How they would feel if a feature was present?
- How they would feel if a feature was absent?
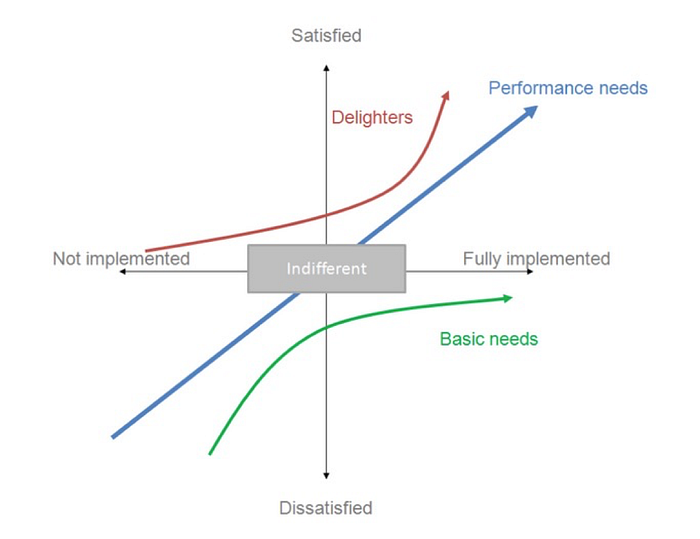
These responses are mapped onto a cartesian grid (shown above), with features falling into 5 general areas:
- Delighter — like the feature and did not expect it to present
- Linear — like the feature and would dislike if it was absent
- Must have — no credit is given for the feature, but people dislike if it is absent
- Indifferent — indifference if the feature is present or absent
- Reverse / negative — dislike of the feature being present & like it when absent
Business Validation
The user validation is one of three points in the rapid evaluation process. The other two points involve the business and the technology. It’s really useful to test with the stakeholders of the team and find out if it’s still meeting the business goals. Is it still answering the promises that you made to investors, or the goals that you have as a company? And if yes, fantastic, and if no, we need to go back to the drawing board.
More often than not, teams are aligned with the business goals and the stakeholders are happy with the results. But if you skip the validation, they might not approve the design or block it at a later stage. So, having your quick check-in with the stakeholders, even if they didn’t attend the entire sprint, can be very useful at this stage.
The key stakeholder of the product often is the one who decides to fund or allocate resources to the ideas. This person is likely you, those working with you, or investors. Be sure to get stakeholders’ review and approval.
At larger companies, the key stakeholder is often a Director, VP, Product Manager, or CEO. If a key stakeholder is not able to attend the full sprint, ask the stakeholder to provide a review in the middle of the sprint before prototyping or attend a final presentation which summarizes the results of the sprint.
Technology Validation
Another piece that’s important here is doing a technical check. A design solution that’s beautiful but no one can implement, is not really that valuable. It’s important for team teams to check in with a technical staff and find out if the product still going the right direction in terms of feasibility. Find out what are the pieces here that seems like they’re going to take the longest and is there any technical issues and is it something that we can test and deliver quickly.
Validations should be quick
The 3 validations; validate with users, validate with business stakeholders, and validate with technology people, these validations can be rather quick. A user test can be 20 to 30 minutes and you can test with three or four or five different people. For most teams, you can even test with one person, it’s already a success. The business validation can be a five to ten minute discussion, or longer if the issue is very problematic. Or the technical validation can be similarly short, five to ten minutes. The 3 validations is best practice and is a checklist to make sure that all the possible ways in which something can fail to deliver after this point are addressed.
Things that can go wrong
Nadya explains the things that can go wrong during this phase. “What could go wrong during this phase is that teams can be overly confident in their own solution and skip the user testing. That is a common pattern that we see with teams that are new to sprinting. They think, well, we can do the user testing later. It is true that the user test can be done separately from this sprint, but that is a miss. While the team is together and they’re fresh in the space of all the prototyping, it is really valuable to right away get feedback. If you do the user test with your whole team present and right after the creation session, this gives the need to write any research documents and it keeps all the ideas fresh in their minds. That makes it that much more likely that the products and the problems will get addressed in the next phase.”
In some cases, users may dislike the solution. Nadya optimistically mentions that “if the users hate the solution it’s a great opportunity to learn. We try to be humble with our designs. After all, we only spend two to five days working on them. We hope that the life of the company will be much longer than that, so those two to five days were valuable if you learn something. So if the users don’t like something, it’s a great time to seek to understand again. So we go back to the first way of thinking, which was let’s understand. What is it that they don’t like, is there something that could be solved better? Asking questions and probing deeper into the things that users don’t like is great opportunity. The best time to learn if the users don’t like something is right after you have created the prototype, into the five days. And not after you spend two years of your life telling everyone you love and maxing out your credit card this is a great idea. So in this stage, we take the users, we let them play with the prototype, and we listen to them.”
Advice for Running Design Sprints
This is the final part of the section where Nadya provides some final words of advice when running design sprints.
“The first key benefit of a sprint is the opportunity for everyone to participate in the design and decision making process regardless of their background. A designer or researcher, someone who is a user experience expert will be able to come in as a leader, and they’ll be able to create great prototypes or lead the user testing. An engineer, or a product manager, or someone who doesn’t have a lot of design experience, will still be able to participate. Because they’ll have tremendous ideas as experts, and they’ll be able to contribute by learning what the users want. By allowing the whole team to be involved in the design process, and to make meaningful and fast decisions, this sprint aligns the team, and now they’re a real community that has a common goal.
The second benefit of a sprint is the ability to redefine your talent pool. Often, large companies and startups are lacking key resources that they need for the sprint. Because sprints are short, they’re an opportunity to invite someone who’s missing talent from your team. If you don’t have a researcher, you can find and hire someone who’s an esteemed colleague or an expert in research, and they can join you for two to five days. That makes it so your talent pool is much larger.
And third, the sprints have the obvious advantage of speed, and speed is the ultimate advantage.”
Final Word
Thanks for reading this article, Part 3 of the Product Design by Google course. If you found this helpful, check out all 4 parts on my Medium account or Prototypr for more key learnings from the course. Don’t forget to check out the actual course itself via Udacity.
A little background
Hi, I’m Christine :) I’m a product designer who’s been in the digital field for quite some time and have worked at many different companies; from large companies (as large as 84,000 employees), to mid size and to very small startups still making a name for themselves. Despite having a lot of experience I’m a product designer who has a fear of suffering from the dunning-kruger effect and so I’m continuously trying to educate myself and I’m always searching for more light. I believe to be a great designer you need to constantly hone your skills especially if you are working in the digital space which is constantly in motion.

