Build a Food Delivery Marketplace without coding (no-code tutorial)
How to use WordPress & Airtable to create a food marketplace
Note: This article is part of my toolkit newsletters↗️ where I share resources about building things. Join me :)
As a full-time product builder & No-Code MVP consultant, I help founders with ideation, market validation, and the MVP process.
This project is part of my “Personal Hackathon Challenge” in which I turn app ideas into functional products within 24 hours without coding. Here’s how I build a food delivery marketplace idea under 3 hours.
1. Starting point💡
Let’s name this project — Food Co. A healthy food delivery marketplace. Users can browse a selection of healthy foods and place orders.
At the same time, people who are interested to sell their foods can list their menu on Food Co. and earn money.
To begin, I list down the parts I want to build:
- A curated list of menu that is available for delivery
- Each menu has it own description and pricing
- Users can proceed to order and make payment
- An application form for users who want to list their food to sell on this marketplace
👉Visit the food delivery site here
2. My toolkit ⚒️
I’m a big fan of using what I know & what I have to launch what I need.
Whether you can code or not, there are existing tools that can help you to build *working* prototype, MVP or product in hours — not days.
In this food delivery site, I opted these tools that help me launch my idea fast:
Airtable
A spreadsheet-like tool that allows you to build database components. I use it to build the food menu selection and customer order form.

WordPress
I host Food Co. using WordPress self-hosted solution. And I park it under my own personal site — whizzoe.com. Save time, save cost.
Elementor
Elementor is a free Wordpress plugin (with paid premium). I design Food Co. based on Elementor for beautiful page components.

Food name generator
I use this tool to generate random (fancy) food menu names.
Unsplash
Get high quality free stock photos for all the food images on Food Co.
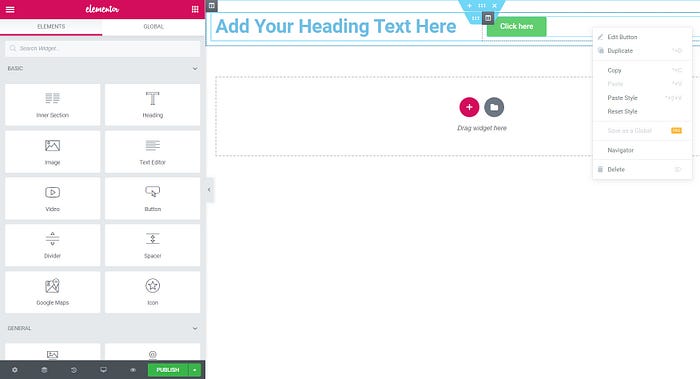
3. Set up Elementor
Install Elementor plugin to your WordPress site. Activate this plugin.
Create a blank Elementor page
- Add a new Page (Dashboard > Pages > Add New)
- Give a title for this Page (“Food Delivery Marketplace Startup”)
- Proceed to “Edit with Elementor”

Add your 1st Elementor component
- Drag an “Inner Section” to an empty space (Left panel > Elements > Inner Section > Drag widget here)
- Add some “Text” elements to fill in the Inner Section
- Duplicate section or inner columns
👉Visit the food delivery site here
4. Style the homepage
Let’s create a clean landing page to explain what the startup does. Following Step 3 above, I design my Elementor page by adding different section, sub-section and text components:

One-liner pitch
Help users understand why your service is unique and who you’re serving to. I also use a free stock food image from Unsplash that goes with the purpose of this site.
Call-to-action buttons
Help users understand the next steps they should take. For example, “Find food” button aims to direct users to a selection of healthy meals. The “Order now” button will get them to place food order and make purchase.
👉Visit the food delivery site here
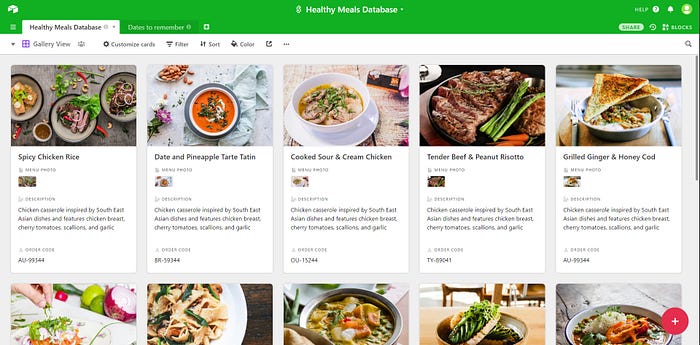
5. Set up Airtable
Let’s build the food menu selection. Go to Airtable and get started: https://airtable.com. Steps:
Add a base
- Click on “+” to add a base
- Click “Start from scratch”
- Name your base (“Healthy Meals Database”)

Define your data
In an empty spreadsheet, add new column and customize field type. Fill up with some dummy contents in each of these database categories:
- Menu (Single line text)
- Menu Photo (Attachment)
- Description (Long text)
- Order Code (Single line text)
- Eat Now (Single select)

Convert into gallery view
Turn the spreadsheet into visual presentation:
- On the top toolbar, click on the “All post” icon
- Add a view, select “Gallery”
👉Visit the food delivery site here
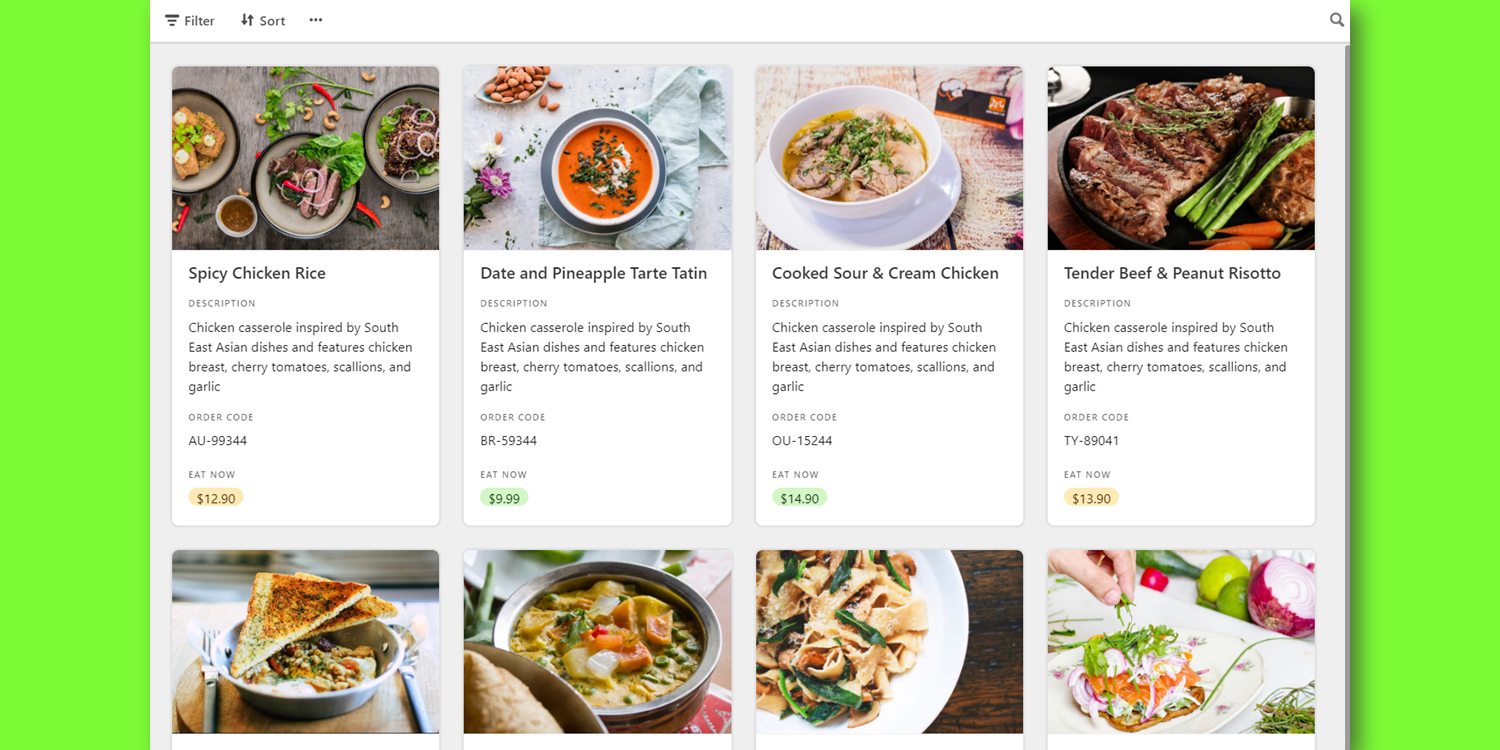
6. Display food selection
Transfer the Airtable food database to your Elementor page. Let’s go through these steps:
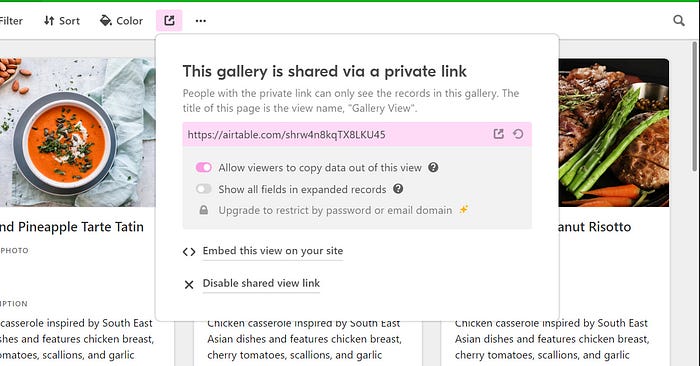
Get Airtable embed code
- Go to the Airtable you created in Step 5
- Click “Share View”
- Click “Create a shareable view link”
- Click “Embed this on your site”
Add a HTML embed in Elementor
- Click on “+” icon (under “Drag widget here”)
- Select your structure (use the first one, single column)
- Drag the “HTML < >” component to an empty structure (Left panel > Elements > HTML)
Add Airtable on the food site
- Copy the Embed code <iframe> from Airtable
- Paste the code in your Elementor’s HTML components

👉Visit the food delivery site here
7. Taking food order
To make the ordering functionality work, you can use Airtable to set up the customer order form.
The form should allow users to select their order, check the pricing, provide their shipping address and proceed to order.
Set up Airtable order form
- From Step 5, add new base Click on “+” to add a base
- Add a view, select “Form”
Here’s what I include in the order form
- Meal order code (to fake the “Add to Cart” button)
- Street address
- Postal code
- City / State
- Full name
- Email address (for invoice & payment)


