How to add AR content to a website
My first time creating a website and embedding AR into it — this was much easier than I thought.

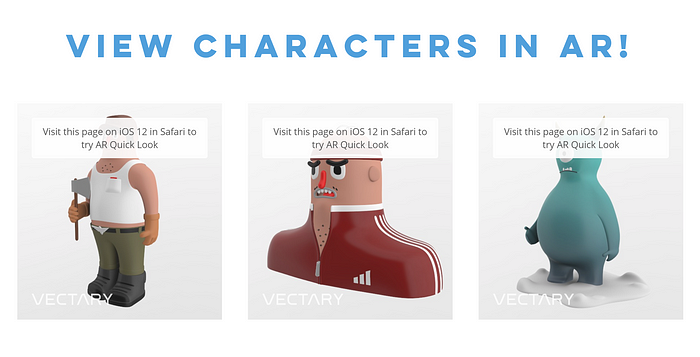
As a 3D designer, I create new 3D models on a daily basis, so my portfolio keeps getting rather big. To put some of these creations to good use, I decided to experiment a little bit and go into uncharted territory: setting up my own online store to start selling my character designs. I also decided to make my new website -Adrian’s Characters- more interactive and embed AR USDZ files to it.
Mind you, I lack both the time and website building skills, so I went for a quick and easy solution for this, using Wix to build the site. To create my 3D models, I used the online 3D design tool Vectary. I will describe below in more detail the steps I followed so you can easily replicate them, should you be interested in doing something similar.
Step 1: Converting a 3D model to USDZ
I created the 3D character models that you can see on my website, all from scratch in Vectary, but you can use any 3D tool that you like. I found this probably the easiest way to save my models as USDZ.
Note: If you only want to use this tool to convert 3D models you’ve already created, register or log in, upload your files by drag and drop (supported file formats are .obj, .stl, .dae, .glb and .glTF) and then export them as USDZ.
The way I did it was rather simple:
- I opened my 3D model in Vectary.
- In the panel on the right, I chose to export it as a USDZ file.

3. Vectary then sent me an email with a link to download the file. I clicked the link, which took me to the USDZ model’s download page, and here I copied the code from the frame. This is actually the code I will later paste into my new website’s HTML to embed the AR viewer.

Here are a few things I had to consider when exporting USDZ in Vectary:
- Vectary will not export a USDZ file with more than 100k polygons, so I had to make sure I didn’t exceed that number. If “Smoothing” is turned on, the polygon count will be bigger than the one shown in the bottom left corner.
- Before exporting my 3D model to USDZ, I had to position it the way I wanted it to appear on the USDZ thumbnail, so it’s good to check that in advance.
- The USDZ code remains the same, so if I export the same model again, the model will be replaced on all of the embedded windows with my USDZ code.
Step 2: Building the actual website
Next, I continued with building the website:
- I went to wix.com and created an account.
- Once I was finished with registering and logged in, I chose a template. There’s plenty of templates available, with over a dozen categories. As I wanted to create an e-shop, I chose from one of the templates in the Online Store category. All their templates come with the same core features and they’re fully customizable. There are also lots of styles — minimal, fun, professional, contemporary — I personally prefer minimal, so I went for something close to that.
- From here on, everything was pretty straightforward. I started customizing the website* by dragging and dropping the features that I wanted, such as image gallery and background. If you want, you can also add your name and contact details here, but I skipped this for now. I also picked the font and the color, which I believe look pretty good.
*A little heads-up: The website is still under construction, meaning some parts are not working yet, but I’ve managed to finish the main structure of it.
Step 3: Embedding the AR USDZ files to the website
And now, the “magic” part — embedding the USDZ code:
- I selected the page in Wix where I wanted my USDZ window.
- I clicked the +Add button from the menu on the left > More > HTML iframe.
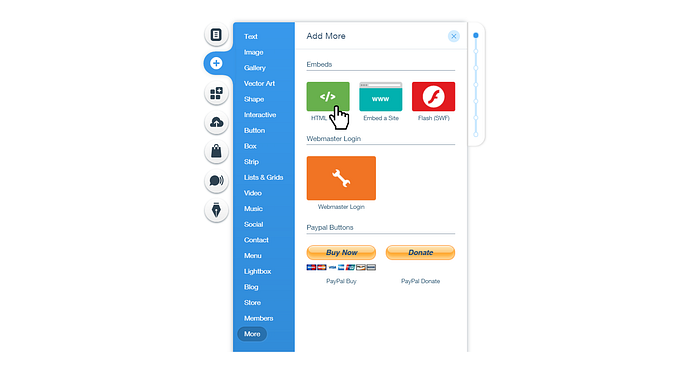
3. This made a blank window appear. I clicked it and then clicked Edit Code.
4. Next, I pasted the USDZ code I copied from Vectary, and the model appeared. With this action I basically embedded the AR viewer on my website. Apple will now automatically overlay the image with the AR button in Safari, on any device running iOS 12 or macOS Mojave.

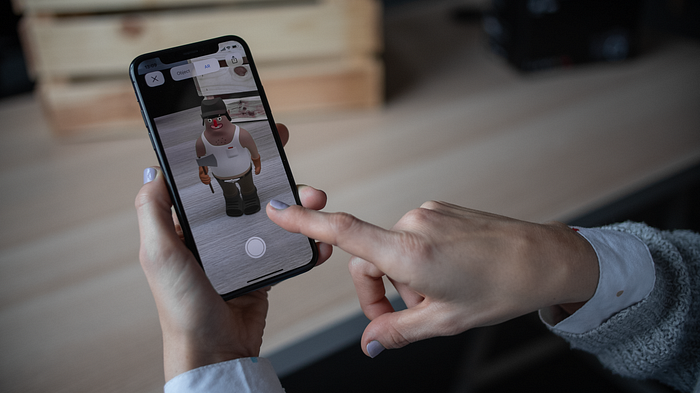
Bonus-outcome: This is how you can see the embedded USDZ file of a model on an iPhone XS using AR Quick Look:
Let me know in the comments if you found this helpful, or if you have a different way of doing this. I’d love to hear your thoughts. Cheers!

