Good sketches will help you think clear
If you’ve done any sort of serious creative work, you are all too familiar with creative block. It feels like hitting a brick wall: None of the ideas you’re able to visualize are good enough, or can’t work in real life.

For designers, the feeling is all too familiar. However, like any complicated problem with no clear solution, a smart process can make all the differences. This is where UX sketching comes in.
UX sketching is a crucial, yet often overlooked, aspect of user-experience design. Sketching is a very efficient way of communicating design while allowing designers to try out a multitude of ideas and iterate them before settling on one.
In this post, I intend to cover everything you need to know about UX sketching, including the following points:
- Introduction to UX sketches and wireframes
- UX sketching basics, tools and techniques
- Clarifying sketches with notes, annotations, numbers
- UX sketching tips and tricks

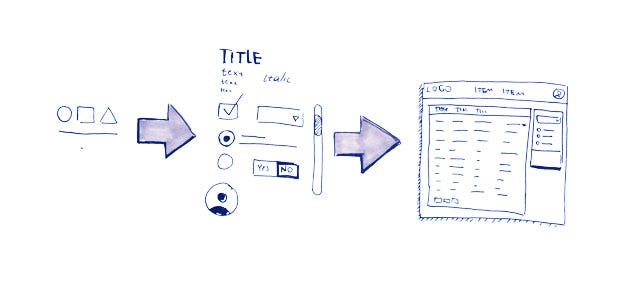
UX Sketching is a Two-step Process
Many options must be considered in design, which results in the choice and the execution of the best one.Designers consider their options, and then proceed to work out the details, thus making UX design a two-step process:

- Idea Generation
In the initial step, multiple ideas are generated, but since they cannot be fully shaped, it is not uncommon for some of the elements to be incomplete or missing. The main thing is to consider different approaches and to decide which is the most efficient in the context of your task and the various constraints of the project.
- Detailization and Refinement
Step by step, you settle on a few promising variants and proceed to work out the specifics, thus rendering some ideas unsuitable.
UX Sketches and Wireframes: Introduction and Classification
Your wireframes may differ depending on factors such as the desired level of detail, colors and style, whether you are going to show them to someone, and so on.
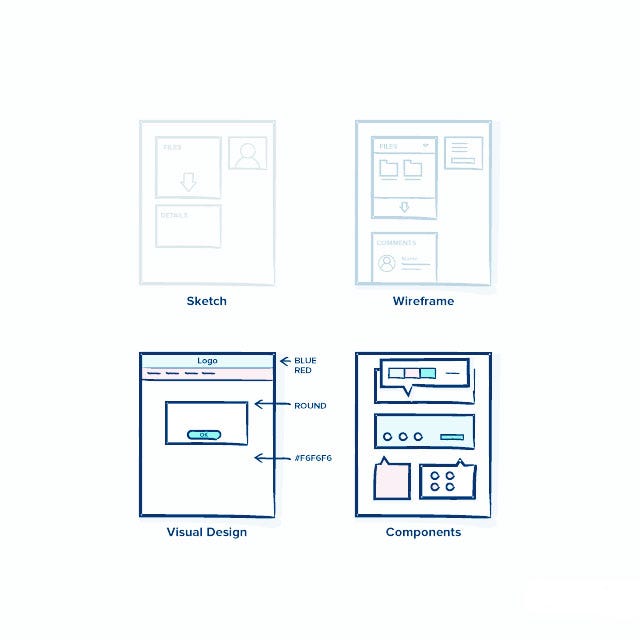
I singled out the following sketch types:
- Sketch: Idea Generation
These are initial sketches. Lower level details are simply noted. A limited number of colors is employed.
Draw a lot of basic sketches to consider the problem from different angles and to consider different solutions. While drawing such sketches, striving to generate as many solution variants as possible.
- Wireframe: Specification, Detailed Phase
Usually pick promising sketches and go over the details, after choose the best variant and work it out in greater detail.
However, this does not mean every single detail. Obvious things may just be noted. Moreover, some aspects will be difficult to describe on paper.
At this step, draw all the important details, but do not yet draw wireframes in Balsamiq. After everything is done on the paper, start drawing in Sketch.
Digital tools provide a lot more creative freedom than paper and you can easily shift attention to minor things. For example, you can focus on “pixel polishing” instead of design.
- Visual Design Draft
This is a rarely used approach, but sometimes it can be helpful. Various visual solutions are considered at an early stage of the project, but it may take a long time to create digital sketches for all of them. That is why draw design sketches on paper first, to consider different options and choose a visual design direction.
- Components/Elements Breakdown
Find this technique useful when I have already have a general idea and I am thinking about a particular page functionality, or of the integral parts of interface components. I draw different page elements, going into detail, and then draw different possible positions of the page elements.
Elements, even the most simple ones, must have a state; a button can be pressed and it has a hover text block that may or may not be empty. The more complex it is, the more states it has.
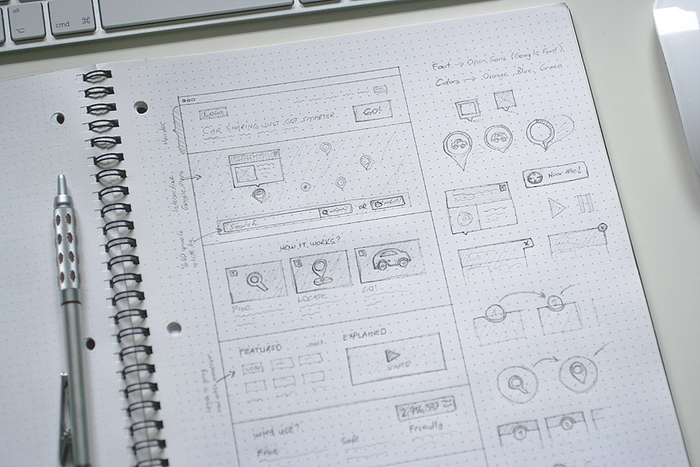
Getting Started with the Basics
- Prepare your tools — Find the most convenient place possible, a large table with plenty of space. Take a lot of paper and prepare some pens and markers.
- Warm up — In order to get ready I recommend drawing some lines, circles, basic templates and icons.
- Define your goals — Decide what you want to draw. Set your aim and decide what story you have to tell. Determine the desired level of detailing. Decide whether you are ready to draw a lot.
- Define your target audience — If you are doing this for yourself, you don’t need to worry about the way your sketch looks. However, if you intend to show your drawings to a client, make sure you allow some extra time to add more details to your sketch.
- Set a time frame — Having decided on the amount of time you are ready to allocate for sketching, let’s say 30 minutes, will help you focus on your work.
Now, you are all set and you can get started:
- Draw the edges — Draw the frames, a browser or phone window, a part of the interface, and so on.
- Add the biggest or basic elements — Menu, footer, main content.
- Add details — Add relevant details, but keep them simple at this stage.
- Add annotations and notes — These are required only if you’re planning to share the sketches. However, they can be useful even if you’re doing them for your eyes only.
- Sketch alternatives — Sketch some quick alternatives to your solution.
- Pick the best solution — Choose the best options.
- Add shadow and bevel — This is particularly important for sharing purposes. Add a shadow to make your sketch visually appealing, which is important if you plan to share it with team members and/or clients.
- Save the sketch — Take a photo or put it in a folder. I have a few paper trays on my table for sketches.
- Share — I usually use one of the following sharing methods:
- Scan sketches via Evernote and provide a permalink to other team members or stakeholders.
- Take a photo and upload to InVision.
- Upload and map images to Realtimeboard.
- Or just email a photo.
Review the sketches and add notes — Take a break and then come back to your sketches a while later. Take a look at them again. Does the sketch still make sense to you? A good sketch must be easy to follow.
If you as the designer can’t understand something you have in your sketch, then the solution won’t be successful. Either the sketch doesn’t allow you to visualize your ideas well, or the ideas are too complex.
Clarifying Sketches with Additional Elements
Find or draw a proper sketch, and then add the following details to it:
- Title — Sometimes adding a title is a good option. Write a description and date, if necessary, at the top of the sketch. The title will help you understand what you are looking at and whether or not the sketch is relevant. This is especially useful if you have a lot of sketches or you are going to show to others.
- Annotations — Annotations are names and notes placed close to an element, to explain its content or other attributes. They add details that clarify other elements, and are usually difficult to draw. For example, it could be the name of the block, some interaction details, an explanation of a picture, some ideas for future design variations, and so on.
- Numbers — Number the elements of your sketch, or the sketches themselves. You can decide how to order them (e.g., by interaction flow, the order in which you created them, etc.). It may also be useful during discussions (especially remote discussions), as your colleagues and clients can just point out the sketch number in their feedback and you will understand which one their comments refer to.
- Arrows — You can use arrows to indicate screen transitions. They can also be used to connect different parts of sketches, to indicate a sequence of actions, and so on. Since the meaning of an arrow can vary, just above the arrow you can add a description or explanation of what the arrow is meant to signify.
- Notes — Just like annotations, notes are used to explain concepts. However, notes differ from annotations in their placement. They are not attached to an element or located near the described element. Notes can be placed at the top or bottom of the page. They can even describe elements that are not included in the design, questions that you may have, general explanations, unsketched ideas and so on.
- Gestures — Gestures are relevant in the case of touch device design. Drawing a hand gesture may require practice. There are several variants of gestures used to indicate different types of actions, so it is better to decide in advance how you designate a particular action (if it is not obvious, of course) and to practice drawing it.
- Feedback — You may receive suggestions for fixing or improving the sketch after showing it to others, or after you take another look at it yourself. It is often useful to mark such feedback in a different color so as to help differentiate feedback from the original sketch.
You can use different colors for different types of elements. Sometimes I use black for drawings, blue for links, dark green for notes, red for titles and feedback. Try to use different colors in your sketches, but make sure your choice of colors is consistent!
More Specific Tips and Tricks
- Don’t worry about the quality — Don’t look at the sketches on Dribble; they are about something completely different. Bear in mind that the main purpose of sketches is to help you think clearer, find better solutions and save time.
- Practice — For a start, you can try to draw a few apps. Open a web or mobile app and try to copy the screen, describing the elements in the notes. Whenever you have some free time, practice drawing basic building blocks of your designs. In general, practice makes perfect. In a while, it will become part of your designer self.
- Buy a folder — Paper sketches are very prone to damage, so buy a simple folder to keep them safe and sound.
- Bring tools with you wherever you go — This helps ensure that you can capture your idea on paper at any time, otherwise you may just lose the thought or not be able to remember it in sufficient detail. Take a notepad, a few A4 sheets, and pens with you.
- Share with others — It’s very important to engage other people and communicate with your team. Involving others and getting their feedback, especially early on, helps save time and resources in the long run. You can also encourage others to draw the way they envision the design.
- Paper trays — Think of placing paper trays on your worktable. For example, I have three of them: For incoming tasks, for sketches, and clean sheets of paper.
- Experiment and customize — My recommendations are based on my experience. In time, you’ll find out what suits you best; which methods, which sequence of steps, what exactly fulfills your creative potential. You will get there only if you constantly try something new, which is why it’s important to experiment with different formats, styles, and try new templates.
- Use templates — Templates will save time and implicitly take into account format restrictions, freeing up more time to focus on what is important.

Wrap Up
The goal of this post was not to create the ultimate, one-size-fits-all guide to UX sketching, or sketching in general, because designers have different needs and personal preferences.
As you can see, this is a lot to cover. Designers use a myriad of tools, techniques, and approaches to produce UX sketches, and it’s rather subjective. Certain techniques may or may not work for different people working on different projects. If you’re just getting started, you should definitely experiment.
Constant practice and experimentation will help you find what works for you.
It’s up to you to choose tips and techniques that will be the best fit for your project and your approach to design. Do you have any additional sketching tips for fellow UXers? Feel free to share them in the comment section.
