Designing interactive experiences
The ‘what, when and how’ of interactive prototyping
More than 5 years ago, when I started to steer my design career towards the technological dark side, interactive prototypes weren’t as popular as they are now, but you could find some of them on the Internet. They were mainly simple animations about new ideas for interactions. What fascinated me most was how these animations communicated an idea in a way that a simple image or a detailed explanation couldn’t. I hadn’t been aware of the full potential of an interactive prototype then, but I put my efforts on making my own animations. Using After Effects and some other complex tools, I did some experiments. Once I finished my first animations, which weren’t nearly as cool as the references I had, one thing was clear to me; my results weren’t worth the effort it took to make them.
After many years, my conclusion about time spent vs. outcomes is still the same, but now I know more accurately why. In addition to that, things have changed a lot in this field, new tools have appeared in the market and the prospect for interactive prototypes is brighter than ever. So, it’s time to review what is the deal with these kinds of prototypes. What is its role in a Design process? How can we build them in order to get positive outcomes? Throughout this article we’ll try to analyze this by answering 3 simple questions:
- The what — What the definition of interactive prototyping is and why it’s important.
- The when — How interactive prototyping works inside a product design process and when the right moment to apply it is.
- And the how — What a proper process to make an interactive prototype is in a way that it can add value to our general design process.
Let’s get started!
What
I don’t know if this happens to you, but when I don’t have a clear idea in my head, I usually try to say it out loud, it helps me to clarify certain concepts, so let’s try to do the same here. As I described earlier, these animations communicate something which is difficult to explain in other ways. Based on this, we can conclude that an interactive prototype is mainly a communicational tool. What many of these animations try to show are new solutions for recurrent UX problems. The years when these animations began to gain popularity is not an accident, remember, UX problems were a constant issue when mobile software was in its earlier stages. There were a lot of new behaviors to address given the new conditions of interaction between users and more personal devices, this created the need for new solutions to improve the UX — keyword being “experience”. Interactive prototypes are communication tools to improve user experience! But we are still missing one more keyword: “simulation”. Through animations, we are not solving the problem directly — we shouldn’t — , we are not even designing a specific solution to code, we are testing assumptions. This “testing” practice, is what I call a simulation of an experience. In the next paragraph I’ll explain more in detail why I think this simulation is important, but to wrap up this part, we could say that an interactive prototype is a communication tool where we simulate user experience.
Now. Is this important? Of course it is! I can’t emphazise enough the importance of the practice of simulating experiences using tools, so just to understand the impact it can have, let’s review a little bit of history, going back to 1968. Yes, interactive prototypes are that old! Please pay attention to the following video because it explains an important part of the design history:
This is Alan Kay’s Dynabook. Alan Kay is one of the most important figures in the technology design field. Based on this prototype, which as you can see was just a bunch of pieces of paper, he established the foundations for the work he later developed in Xerox PARC. The lesson here is: Alan was one of the first engineers of the past generation to notice the importance of simulating experiences in order to have a clearer vision about the future, a vision that can be communicated to his colleagues. Sharing that vision, he was improving the way iteration is performed, and how this iteration helps to create better products. If you haven’t realized the importance of simulating experiences yet, think about this: This was a guy showing something very similar to a tablet created back in 1968, 17 years before the first computer with GUI appeared on the market, almost 40 years before the first iPad. So, yes, simulating experiences is highly important for a product design process because it addresses one of the key objective we have to accomplish; to provide good experiences for the user.
“The best way to predict the future is to invent it” — Alan Kay
Side note: this is probably my favorite quote by Kay, although at risk of being called out, I will expand this sentiment a little more: “The best way to predict the future is to invent it, and the best way to invent it is experimenting”.
When
It’s a little bit difficult to determinate when an interactive prototype should be used in a design process. So take this just as a personal opinion. Giving we get to the conclusion that interactive prototyping is a practice of simulating experiences, it has a high value at the moment of sketching experiences, when the product is just a bunch of problems to solve.
Companies have different names for this kind of phase: planning, strategy, design, etc. I prefer to call it “sketching phase”. Bill Buxton in his book “Sketching User Experiences” defines the practice of sketching as the foundation for a design iteration, he outlined some principles to recognize if what we are doing is a sketch or not:
- It’s quick to make and be provided when needed
- It’s cheap in terms of efforts and disposable
- Has a clear vocabulary and distinct gesture
- Has minimal detail
- And finally, it suggest and explore rather than confirm
So, when I’m talking about interactive prototyping inside a sketching phase, it has to follow the same principles. Mainly regarding the last point. The simulation of the experience we are trying to create should suggest and explore rather than confirm a solution.
There is an important challenge in terms of how “cheap” it can be. Making an animation even with the technologies we have now still has a relative high cost. Here is where these efforts need to be combined with other techniques, like actual sketching, starting by drawing in a piece of paper in order to increase through the exploration the amount of possible solutions, and also in order to reduce the inevitable bias we are going to get if we prototype something as a solution directly. I’ll explain in the following section a more detailed process to do so.
Although the general recommendation is to use this technique as a way to explore and simulate solutions in early stages, there is a secondary use. As I described at the beginning, animations have a huge potential as communication tools. I’ve seen through my career how many companies struggle communicating requirements, this problem has created the need to come up with more tools to make this communication of requirements easier and effective, but many of these tools are still based on written descriptions rather than interactive simulations. Here is where an interactive prototype can play a major role as a way to show directly and in a more interactive way a designed solution, so engineers or whoever is going to develop it can understand it deeply, reducing risks of miscommunication. A hint: all the developing processes have a ‘bug rate’, which is the time developers spent solving bugs. I don’t have the numbers but in my experience many of these bugs are the result of miscommunications. If there are effective ways to reduce this rate, it will definitely be worth to invest time in it.
How
Disclaimer: the core of the following process I’ll try to use as example, is iteration, you know, a communication tool is made to be used in a communicational environment, something that you can’t do by yourself. I don’t have a design team available right now in my pocket, so in the moments where an iteration is needed, I will put an <Iteration> label.
1. Be really aware of the problem
This initial part seems simple but it can be a little bit more complicated. There are plenty of problems you can recognize when you’re working on a new product’s design. But recognizing a problem is not the same thing that being aware of the problem, because this also means to understand it deeply in order to know how it will affect the user’s needs, or in other words, it’s not just to know what is wrong with something, it’s also to understand why is wrong, and what is the need we are going to address behind the problem.
Let’s imagine we are working in a chat app. There are plenty of chat apps in the market, so we want to create something different in terms of experience — alert: In this case ‘different’ doesn’t mean just something new, it means an evolution of what the user has right now available — . I’ve run a simple research using google, looking for the most common complains about chat mobile experiences. I found an interesting one:
“It’s difficult to jump between active conversations” — Someone
Why is this interesting? Because none of the most famous chat apps are trying to make things in a different way in order to give a better experience for this ‘problem’. All of them have the classic system of 2 layers: A list of users, and the individual chats. But jumping between conversations is a very common practice from an user perspective. <Iteration> Once we have the ‘problem’ over the table is time to iterate with your design team, a good started point is trying to answer some basic questions; Is this problem a real problem? How does this complain affect the user’s behavior? How is the user behavior in this specific situation? What are all the variables we need to consider? Do the outcomes be worth the investment of exploring a solution?, etc </iteration> To move on in our example, let’s assume that yes, this is a real problem, that its solution will provide a high value to our product and it will improve the user’s experience.
2. Sketching time!
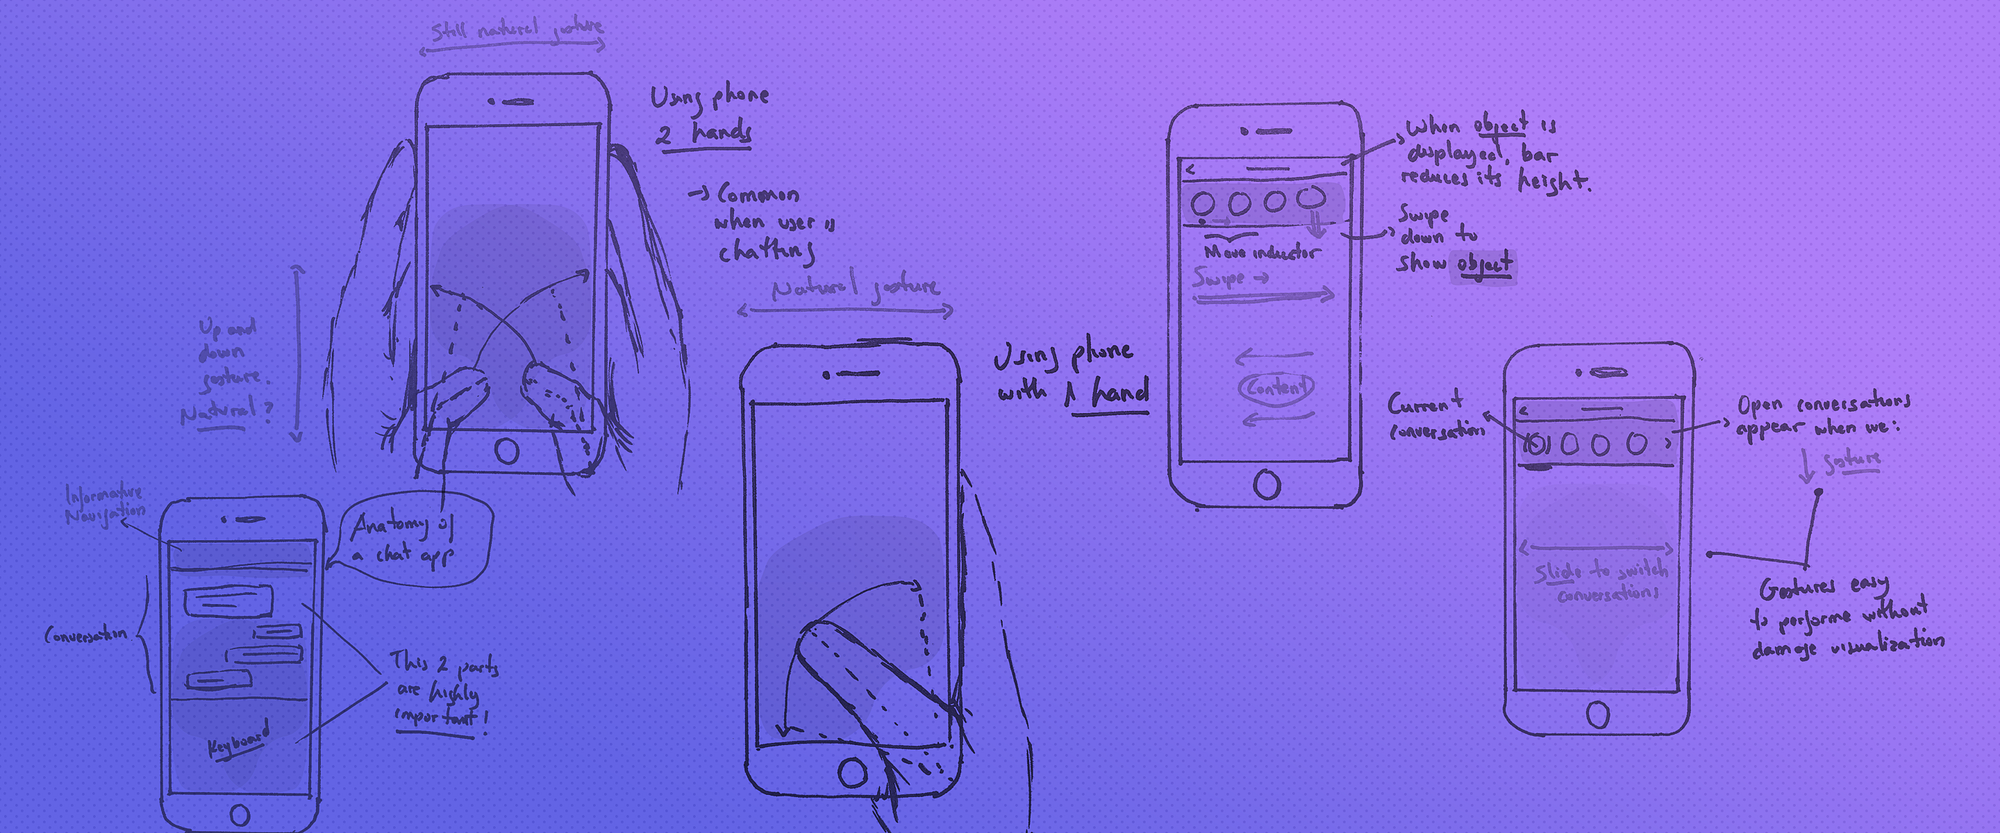
Let’s split the sketching exercise in 2 parts, first I’m going to test through drawings some foundations of the user’s behavior when he/she is interacting with a mobile device, this will provide a context before to sketch possible solutions — sorry for my poorly made drawings btw — .


What I’ve done here is to outline the basic user’s behaviors using a chat app, trying to put over the table more questions: What is the most common position of the user’s hands when is using a phone? When he/she is chatting? Are the current solutions considering this? What are the constraints we need to consider before to sketch solutions?, etc <Iteration> Again, we need more iteration here, not to answer those questions directly, but to generate hypothesis based on them. And that’s the second part:

This is my personal proposal; a simple bar at the top of the screen that can inform us who are we talking with, showing us other open conversations in the same screen. Using swipe gestures, we can jump to the next one, like a simple photo gallery. This is just one option after many drawings I’ve made, Why did I choose this one? Because based on the behavior I’ve analyzed, considering the reachable areas and natural gestures, it seems to me the more logical one. The process to make these drawings is easy and quick, or in other words, cheap. This work should be just a very small part of the whole iteration we need to perform among the team, in order to generate a larger amount of possible solutions </iteration>. Nobody is paying me to write this article, so I picked the one personally seems most promising. What option is the most promising? The one that generates more questions! Not because is the craziest one, but questions in a sense that can create the need to be tested ‘in the wild’, in order to clarify the assumptions we are making with our proposals. Here is when the need for an interactive prototype appears and the creation cost of it is justified.
3. Execution
Now is time to build the prototype. I’m going to use Framer because is the tool I’m most familiar with, and considering its features, it allows me to do it relative quick. Before to jump there, I need to have accurate instructions to not waste time coding. So this is the plan:

Ok, now the idea is clearer — at least for me, as I said, I’m working on improving my drawings — Now I can imagine in my head how to code it. I’m not going to dive into each line of code, mainly because I’m not an expert in CoffeeScript and I’m ashamed of my code. But if you want to see it personally, here you can download it from my GitHub.
And.. (drumroll), here is the result:

Here the Framer prototype.
I know, a little disappointing, isn’t? Maybe you expected a finished design. I could do it easily, not because I’m a very skillful designer but because I don’t have a interesting life and I prefer to spend my weekends doing stuff like this — you’re welcome — . But that’s not the point. This is a dangerous area. When we are prototyping interactions in order to get UX conclusions, very often our inner visual designer appears. If our objective is to work on UX, UI design doesn’t help at all because it’s distractive. Don’t get me wrong, a good UI design is important, it complements the UX and adds huge value to it. But if our objective is to test a behavior, it’s in our hands to drive the focus towards to it, making the prototype as simple as possible. Do you remember the sketch principles? This is the time to apply them.
Anyway, just for fun and to show you the secondary use of a interactive prototyping as a way to communicate requirements, let say we’ve completed the whole design process, this prototype has passed for all the iteration sessions and have reached a point where we’re all agree this is the solution to code (warning: It doesn’t mean this should happen, actually if something like that happens, we’ve done the things wrong). Applying UI design, it could look like this:

4. Simulating the experience
You could think that’s it but we are not yet. What I’ve built is just a tool for a simulation, now we need to experience the simulation. One of the reasons I’ve used framer is because it gives me the opportunity to easily run a test in my phone, as a real app. We need to do that in this part, we need to play with the prototype. Not one time, not just few minutes, not just us. There are different protocols to evaluate a testing phase, it depends on many factors, but in this case let’s do the things simple. I’ve used this prototype for 3 days. Once I had the need to send a message to someone using other apps, I also opened this prototype and played with it. When I’ve been chatting with more than one person at once, I did the same. The idea was to manipulate the prototype under the same environments and circumstances than when I have a real need to chat. This is just a simple protocol, but if you’re working in a bigger product, which involves larger audiences, it will worth to write a more detailed one, with specific metrics to be able to measure the results. I also recommend to record the manipulation of the prototype. Keep in mind that we are not just evaluating how the solution works, we are analyzing how the solution works for the user.
5. Measuring results
As I mentioned, there are a lot of metrics we could outline to measure results, in this case what we are trying to answer is a simple question: Does it work better than the current approach? But we are not looking for a Yes or No answer, because is not the answer what it matters, is the amount of conclusions and content we can generate based on the question I’ve put over the table. Probably this is the second time where iteration is highly important. At the beginning we had iterated in order to set the problem and to generate a large amount of possible solutions, now we need to iterate in order to analyze the result of the simulation experiments. What is the user reaction to this new behavior? Is it an improvement? What risks we can notice? What are the improvements we need to do?, etc.
Final Thoughts
What kind of article is this? Having as a final result more questions! Well, that’s the point. Bill Buxton in his book I mentioned earlier explains it in a simple way:
“Design is choice” — Bill Buxton
What I think Buxton is trying to tell us, is that design is not the process to generate the right solution, is the process to explore and analyze alternatives. Our creativity and collaborative work will allow us to explore a large amount of alternatives, and you could think that the process to chose one of them is the biggest challenge, but if we’ve performed the iterations having a good amount of alternatives and using the right process, the answer for which path to follow will be quite obvious then.
Thanks for reading!
PS: Cheers to the Framer Team, the last update of the tool helps a lot to make these prototypes cheaper. Great work!