Complete guide for making animated perspective design or story that nobody wanted to tell me
Let’s work together 👉 alexkukharenko.com/contact/
Prehistory
Last year many designers noticed a huge trend to animate mobile design and to present it in a nice perspective look. I thought: How do they do that?
I knew exactly, that it would be possible if I moved all UI assets to the After Effects and then animated it there. But that’s ridiculous! I was not going to spend hours to receive a nice gif animation without an opportunity to open a prototype on the device.
So, I tried to find a way (it was a wrong way):
- I made a UI design in Sketch
- I moved a sketch file to Flinto and made it interactive
- I had a .mov file which I converted into a .gif one
- I added the .gif file to Photoshop
- I applied the “Free transform” tool for the .gif to change the angle of UI
Thus, I got a blurred gif file with the unsharp text. “What the hell? How do other guys do that?” — I thought. And I turned my efforts to get more insights from more professional interactive designers than I am.
During my unsuccessful research, I faced with a fact that plenty of designers don’t know how to do it!

The last drop in my sea of despair was the conversation with a designer who knew exactly how to do it, but he was silent.

I wondered how I could find a way to share the solution with a community and to shed some light on the problem. And I found it out! Turn on your coffee machines — we are going to work!
Preparing a software

You have already almost everything you need (if you are UI designer):
- Sketch — a tool for making design + this plugin.
- Flinto or Principle — prototyping tools which help to record a video of interaction. Flinto has 14-days trial and allows to open the prototypes on the device.
- Adobe After Effects — powerfull video editing software. It will help to move recorded video onto a device’s mockup. You can get a free trial version by this link.
- Adobe Photoshop — tool for making gif files.
Making a design
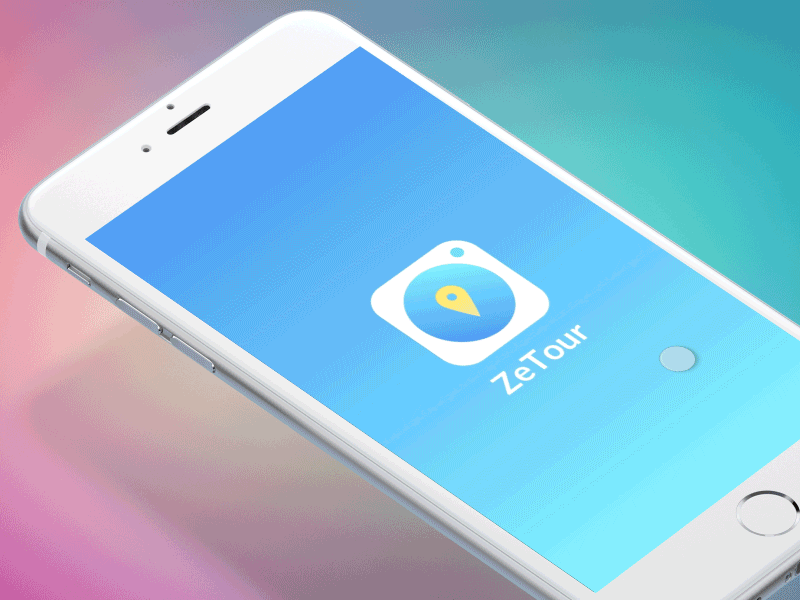
Prepare a mockup in Sketch. Keep in mind that if you want to try yourself in the interaction design you need to prepare several screens or 1 screen with different states. I took my design of onboarding process from ZeTour App, where I am a co-founder.

Making a prototype
Export your screens to Flinto by “Send to Flinto” plugin. To do it choose the artboards on the left side and run a plugin (Plugins — Send to Flinto). We have to export artboards in high resolution only. I export my design in 2X resolution for iPhone 7 and get 750x1334 files, for instance.
I used this tutorial to animate my design. If you aren’t an experienced user of Flinto, try another tutorial.
I recorded my interactions by using recording feature in Flinto and saved a file as .mov.
Locate a video inside a device’s mockup
Before we go to After Effects you need to download device mockup in PSD format (that one, for instance: http://bit.ly/2fCvKXI). I would recommend to use PSD mockups that contain only 1 view of the device, otherwise After Effects will ask you which folders to merge.

Open After Effects and create a new project. Switch workplace to “Effects” view (Window — Workspace — Effects) and drag your .mov video and device mockup to Project panel.

And then drag a .mov file and PSD mockup to the “Timeline” panel. You will see this result:

Most of the work will be done in “Preview” workspace. Before we go further, we need to change a composition’s resolution. You can get “Composition Settings” by clicking the right button on a composition item and by applying settings. I wanted to use this prototype as a gif shot in dribbble and to set up 800x600 px resolution.


Done. Let’s then continue with the preview panel. Did you notice that our preview window become smaller? Select a track on the “Timeline” panel and step-by-step change the size of the layers so that they can fit into the nice shot. Pull the corners to resize the object and use Shift to leave it without distortions.

We come up to the most interesting part of this story — we are going to put a video into the device. Click on the video layer and choose the Corner Pin effect (Effects — Distort — Corner Pin). And, then, carefully put the video’s corners on the device screen. Don’t hurry, this step demands accuracy.
Disable the “Timeline” panel, if you have a small screen (Windows — Timeline). As soon you complete, press a Space on keyboard to see the result. The first loop will slowly render the video, but the second one will play smoothly. I don’t know how you will react, guys, but the first time I have done it, I was dancing!
Hint!
You can continue playing with that PSD file. Once you save the changes, it will be applied to the After Effects project. I decided to change the background of the mockup in Photoshop and it was instantly updated in After Effect. I appreciate the Adobe ecosystem.

Exporting
Select a composition and go to File — Export — Add to Render Queue and a new tab will be added to the bottom panel.
Click on the dropdown icon near “Output Module” and choose “Custom” item there.

Choose “Quicktime” as a format, and click on the “Format Options” button. Find H.264 video codec in the list and choose it. Then, press OK twice and click on the blue “Render” button.

Getting a GIF
Make one more render but with another setting (choose “Photoshop” in output module). Files will be saved on the Desktop in the folder with a name of Project.

Go to Photoshop, find _00000.psd file, open a PSD as a sequence and choose a frame rate. I had a 5 sec video, so I decided to use 30 frames per second. Try to make your gifs smaller than 7 MB.

Press Shift + Option + CMD + S to get “Save for Web” window and choose these settings:
- GIF
- Adaptive
- Colors: 256
- Transparency: On
- Quality: Bicubic Smoother
- Looping options: Forever
Result
I am fully satisfied with this result. It was hard to find but easy to achieve. Everybody who is able to make a design in Sketch can repeat this path and make his own creative animation.
Happy end

I feel happy for 2 reasons:
- I found the solution
- I can share it with designers
Wish you luck with After Effects!
PS
If you need a kick-ass UI/UX, I am open to new projects. Let’s get in touch alexkukharenko.com/contact/