Automate your UX Design workflow with Framer.js, Gulp and Sketch

[ Update 04.01.2017: recently the awesome guys at Framer added a powerful component that helps you transition and navigate between multiple screens: Flow. I’ve just tried this useful component and it just works fine.
Update FramerJS in your node_module and enjoy the FlowComponent. ]
First things first, after years, I’m back to blogging. Nice feeling, it’s always a good thing when you want to share experiences and thoughts with the community. Be nice with me, it’s my first post after a while.
After a couple of years of pure coding and project management activities, I’m back to UX design too… and design is about thinking products that work for people. To reach your goal, as designer, you should present in a clever way your design concepts, you should test the user flow and you should provide clear explanations about your design choices.
If you were in 2006, JPGs and a long meetings would be fine. But, wait. We’re in 2016 and today you can prove your ideas are working and your assumptions are correct creating a prototype with testable interactions and real animations.
Today the final result of our efforts will be the following.
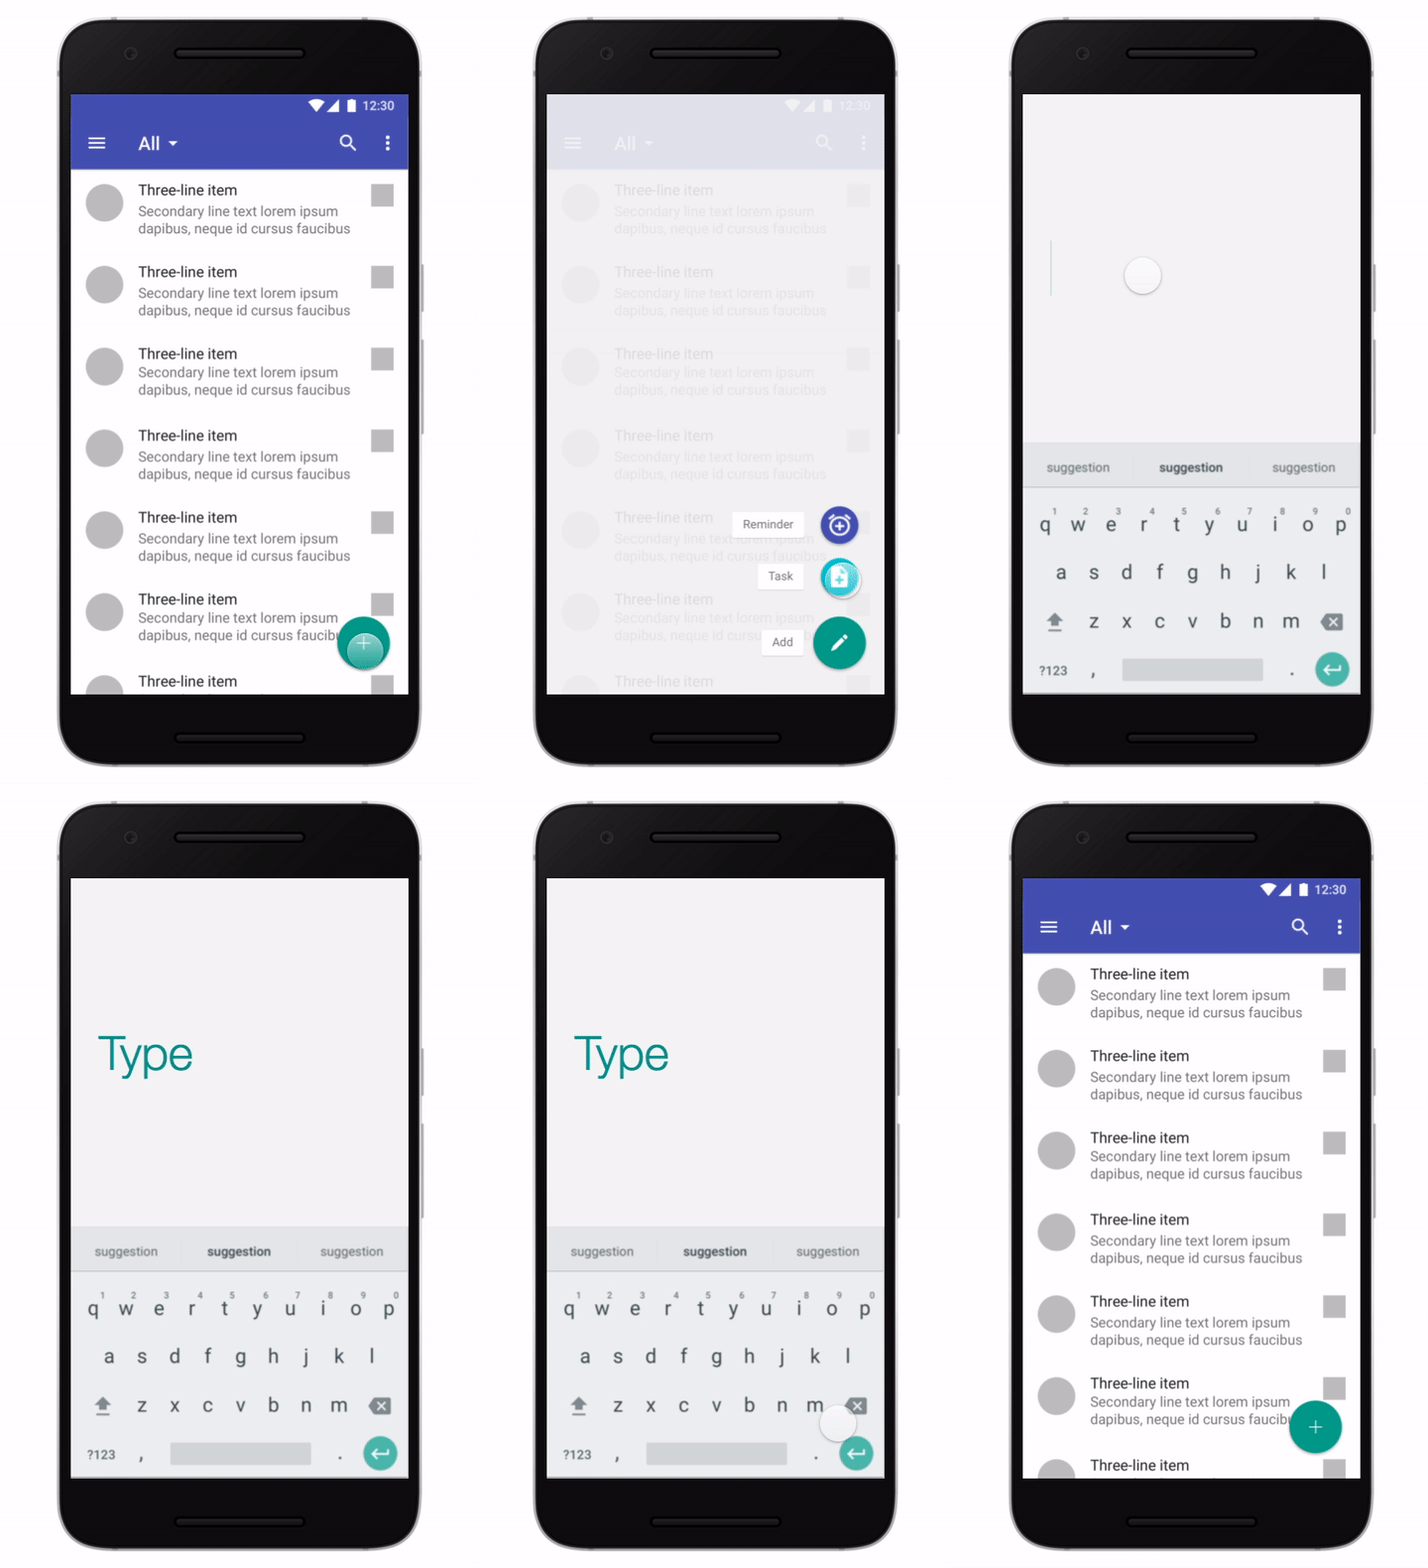
If you want just run and play, go to the GitHub repository and enjoy it.
Here you can test the final result: http://framer-ux.herokuapp.com/
Seriously, create prototypes
I have to be honest, I needed some proof. I didn’t see prototyping as a necessary step in my design process, it seemed to be a waste of time; but, in a random fashion, I’ve spent a lot of time:
- arguing my design choices with managers
- explaining to lazy developers why we need to implement that particular user flow or animation
- failing at user tests
- making wrong assumptions
- proving that clients (often, but not always) are completely wrong
I needed to find a way to optimise my time, and I tried to prototype portions of user flow and some hard-to-explain interactions. Guess what? People understand me better and they provide more valuable feedbacks after testing a real prototype. The final product gains a lot of benefits (and our clients too… of course), it will be more close to user expectations and mental model.
To be clear, discussing with managers, clients and colleagues is not so evil. You can always improve and generate good ideas from a positive discussion, I’m just saying that with prototypes you can create smart and more engaging user tests and design discussions.
An non-exhaustive list of advantages deriving from the creation of working prototypes is:
- performing more precise user tests
- receiving more valuable feedbacks
- anticipating possibile technical constraints with developers
- defining client’s expectations
Why Framer.js?
There are a lot of almost-free tools out there: InVision, Marvel, Proto.io and so on. They are all ready-to-go and good solutions to create your prototype.
So, why my choice is Framer.js?
The Readme file of the GitHub repository says:
Framer.js is an open source JavaScript framework for rapid prototyping. It allows you to define animations and interactions, complete with filters, spring physics, 3D effects and more. It’s bundled with Framer Generator, an application that allows you to import layers directly out of Photoshop and Sketch.
Below some key points that convinced me Framer is good in order to improve my design process and workflow.
[Yes, it’s a JS library. Ball is in your court, you have to code!]
Open source
It’s an open source project (https://github.com/koenbok/Framer) that basically means free to use and cost optimization. You will also earn in terms of freedom, flexibility and customization.
Active and large community
Open source means community: a bunch of contributors who constantly fix bugs and improve the framework (https://github.com/koenbok/Framer/graphs/contributors) and a lot of people that share knowledge, case histories, tutorials and examples. You can join the Facebook Group to be updated.
Learning curve
Framer.js has four main concepts: Layers, Animation, States and Events. They are basic concepts, easy to understand, that will allow you to create great prototypes. You will write code in a very natural way even if you are not a developer.
JavaScript
It is one of the most used programming language. With Framer, actually, you use CoffeeScript but you will be able to extend your prototypes in a JavaScript world, that means you can perform XHR requests, import other libraries, implement logic and algorithms in order to make your prototype smarter, and so on.
[Personally, I don’t like so much the use of CoffeeScript but we can survive]
Modularization
With JS you can create reusable components and create a repository of modules that you can share in different projects.
Versioning
We can use the power of Git to track the prototype history and collaborate with other team members. Trust me, it’s really cool.
Adoption
Top-notch designers and teams at Dropbox, Twitter, Google and Facebook are using Framer as a fundamental piece of their workflow. Take a look at Dribbble tag page for #framer to discover new members of the Framer family.
Introduction to Framer.js
As you already know we are talking about a JavaScript framework for rapid prototyping. Here a quick introduction.
Language: CoffeeScript
CoffeeScript is a language compiled to JavaScript (.coffee files are not interpreted at run time). It has a clever syntax, some performance and code style optimizations; and below there are some examples to get started with CoffeeScript.
First, rembember that Indentation counts, it is used to define the structure of the language.
Variables
Variables don’t require var.
name = "Pier"
year = 1986
fullName = name + "Doe" # Pier Doe
Functions
Declared by naming the function, equals sign, parameters and then a the symbol ->.
sum = (a, b = 2) ->
  a + ba = 4
sum(a) # -> 6
Arrays
You can use array as usual with Coffee with some extra features
alphabet = ["a", "b", "c"]
firstFive = [1..5] # range = [1, 2, 3, 4, 5];
Object literals
You can declare objects in Coffee avoiding braces:
people =
  dev:
    name: "Pier Nad"
    skills: ["JavaScript", "Ruby"]
  designer:
    name: "Carl B"
    skills: ["Framer.js", "Sketch"]
Classes
They are declared in CoffeeScript with the keyword class followed by the name.
Methods and construcotr are written with the name of the method followed by a colon.
class Person
  constructor: ->
Instance Variables
An instance variable starts with an @ symbol
class Person
  constructor: (name) ->
    @name = name
Class Inheritance
To write a subclass you can use extends keyword
class Employee extends Person
  constructor: (name, jobTitle) ->
    super name
    @jobTitle = jobTitle
Loops and flow control
A simple for loop:
for name, i in ["Pier", "Carl"]
  alert "#{i} - Employee: #{name}"
The convention of optional parentheses continues with CoffeeScript’s if and else keywords.
if true == true
  "Passed!"if true != true then "Something wrong here!"alert "Yeah!" if season == "Summer"
This was just an introduction, if you need to learn more about CoffeeScript, below some useful resources.
- CoffeeScript doc: http://coffeescript.org/
- The Absolute Beginner’s Guide to CoffeeScript: http://blog.teamtreehouse.com/the-absolute-beginners-guide-to-coffeescript
- The Little Book on CoffeeScript: https://arcturo.github.io/library/coffeescript/index.html
Layers
They are the basic block of Framer, you can think of layers as shapes with attributes that you can move and animate within a sort of canvas.
mySquare = new Layer
  x: 0
  y: 0
  width: 100
  height: 100
  opacity: 0.8
  backgroundColor: "black"
Yes, it’s exactly what you are thinking, a 100x100 top-left black square with 80% opacity.
Cool, but you don’t want to manually create all layers of your app prototype. You can set your properties directly in Sketch, and I suggest to do that. A good rule, in my opinion, is: you should focus on interactions in Framer and do the graphical things in Sketch.
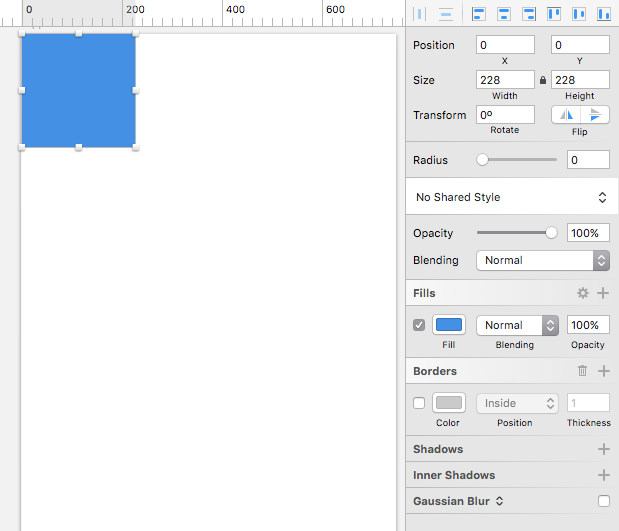
If you draw a 228x228 square in position top-left (x=0 and y=0) in Sketch, using Framer Generator, you will import the same layer attributes. Your square will be the same inside the Framer canvas.
To be consistent, remember to group your layers in a clever and mnemonic way and avoid name repetitions.
You can just import layers from Sketch (we use Framer Generator).
app = Framer.Importer.load("app.framer/imported/app@1x")Now you can access all the layers through the variable app, play with them and change attributes
app.overlay.opacity = 0.6 # app.layerName.attribute = valueIf you want to change the initial properties of your layers, you can either import again after you edit in Sketch or directly edit in Framer.
[Learn more: http://framerjs.com/docs/#layer.layer]
Events
Events are things that you can listen for. Framer supports event listeners such as Click, TouchStart, TouchEnd, Scroll, Drag etc. It’s easy to understand what they mean by their name.
A click example we’ll be useful: print “clicked!” when user click on a specific button layer.
app.button.on Events.Click, ->
   print "clicked!"
When an event is called we can handle two arguments: the first one has event information (containing mouse positions etc…); the second argument is always the layer responding to the event.
app.button.on Events.Click, (event, layer) ->
  print "Clicked", layer.name
# "Clicked", "button"
[Learn more: http://framerjs.com/docs/#events.events]
States
You can simply think of state as a number of attributes between state A and B, indeed they are sets of layer properties and values. You have an initial state (State A) and then you can add, remove or switch states.
# Add two states to button layer
app.overlay.states.add
  stateA:
    x: 500
    opacity: 0.5
  stateB:
    x: 200
    opacity: 1app.button.on Events.Click, ->
   app.overlay.states.switch("stateB")
[Learn more: http://framerjs.com/docs/#layer.states]
Animation
Animation objects manage animations that target a layer and. You can think at animations like this: if you trigger an event, something moves (layer) following some specified rules (state changes).
You can customize animation options in states like this:
app.overlay.states.animationOptions = curve: "spring(300, 30, 0)"You can also create animation objects and attach a layer that will move, like this:
# Repeat an animation 3 times, delay for 1 seconds, target the layerX
animationD = new Animation
  layer: layerX
  properties:
    x: 100
  repeat: 3
  delay: 1
[Learn more: http://framerjs.com/docs/#animation.animation]
To learn more about Framer.js, below some helpful links:
- Framer.js doc: http://framerjs.com/docs/
- New to Framer? Just 3 Things to Get You Started: https://medium.com/framer-prototyping/new-to-framer-just-3-things-to-get-you-started-47397f27c71e
- Framer for beginners: https://medium.com/framer-prototyping/framer-js-for-people-who-think-things-like-framer-js-are-weird-and-hard-add2068c8114
- Working with Framer: http://humaan.com/prototyping-with-framer/
- Framer.js group: http://framergroup.com/
Project goal
When I prototype with other prototyping tools I find a bit annoying the import phase. When I change a design component or an animation I don’t have an automated reload and I can’t frequently check the prototype flow and the interactions.
Our goal is to create an automated workflow to simplify our life by eliminating waste of time importing assets, maximizing the time we spend solving UX problems, testing in real time flows and interactions and easily sharing the prototype.
So, we want to:
- use Sketch to create our design and look and feel (or just a wireframe, it’s up to you)
- slice and import new assets to be used in Framer
- edit our CoffeeScript main file with our text editor in order to add interactions and animations
- save our progress and immediately test the latest version of the prototype
Below you can take a look at my preferred set-up on my Mac.
Desktop 1: my favourite text editor (https://atom.io/) to modify source code and the terminal to run automated tasks and do nerdy stuff.

Desktop 2: Sketch to design, Framer Generator to import assets and the Finder.

Desktop 3: browser to test our progress in real time

With Framer we are in a JavaScript world so we are going to create our prototype framework with the help of libraries such as:
- Gulp, a toolkit that helps you automate painful or time-consuming tasks in your development workflow
- Webpack, a module bundler that takes modules with dependencies and generates static assets representing those modules
- BrowserSync, to keep multiple browsers & devices in sync building our prototype
Let’s start: project set-up and structure
We need Node.js and npm installed. The best way to install them is Brew, open your terminal and type:
$ /usr/bin/ruby -e "$(curl -fsSL https://raw.githubusercontent.com/Homebrew/install/master/install)"
$ brew update
$ brew doctor
Install Node and npm
$ brew install nodeCreate project folder and init package.json, where we are going to specify libraries and tools we want to use.
$ mkdir ux-framer-prototyping
$ cd ux-framer-prototyping
$ npm init
Follow the wizard and then you can customize your package.json.

This file allows us to keep track of our project dependencies. Here’s a package.json I made.
Easy to read, we have all our project dependencies listed. One thing to specify: I’m using GitHub as source for Framer.js code, I had some problems with the npm source and I’ve added a postinstall script to build Framer after download and modules setup. So don’t forget to add the postinstall.sh file in your project root with the following commands.
cd ./node_modules/framerjs
npm install --only=dev
mkdir -p build
gulp build:release
cd ../..
gulp build
Now we can run npm install to download and build all necessary libraries.
Now we create a src folder in the root of the project with all our necessary files (go to the GitHub repository for reference: https://github.com/piervix/ux-framer-prototyping/tree/develop/src)

- images contains project images
- modules will contain our helper and Framer modules
- app.coffe is the main app file of our prototype. Here will go the main code
- app.sketch is our whole design, our Sketch file
- index.html is our main presentation file that will be compiled and served
- style.css is our main CSS file
Next, we can add the necessary index.html
and our stylesheet.
Don’t forget to install Framer Generator app.
An automated workflow with Gulp and Webpack
We have the skeleton of our project and now we are going to add some Gulp tasks to automate our workflow.
Remember the goal: we want to work in our Sketch file, add interactions in our CoffeeScript main app file, save and automagically update the animated prototype with the new code and images inside the build folder.
We do the magic with Gulp.
Create a Gulpfile.js in your project root and start by requiring necessary libraries and defining your paths object.
'use strict';var gulp = require('gulp');
var coffee = require('gulp-coffee');
var gutil = require('gulp-util');
var sketch = require('gulp-sketch');
var del = require('del');
var webpack = require('webpack');
var mergeStream = require('merge-stream');
var browserSync = require('browser-sync').create();
var path = require('path');
var argv = require('yargs').argv;var webpackCfg = require(‘./webpack.config.js’);var paths = {
  framerModuleBuild: path.join(__dirname, 'node_modules/framerjs/build/*'),
  src: path.join(__dirname, 'src'),
  build: path.join(__dirname, 'build'),
  buildFramer: path.join(__dirname, 'build/framer'),
  buildFolders: path.join(__dirname, 'build/**/**/*.*'),
  buildImages: path.join(__dirname, 'build/framer/images'),
  appIndex: path.join(__dirname, 'src/app.coffee'),
  appHTML: path.join(__dirname, 'src/index.html'),
  appImages: path.join(__dirname, 'src/images/**/*.{png, jpg, svg}'),
  appModules: path.join(__dirname, 'src/modules/*.coffee'),
  appCSS: path.join(__dirname, 'src/style.css'),
  importedFromSketchFold: path.join(__dirname, 'src/**/imported/**/**'),
  importedFromSketchJson: path.join(__dirname, 'src/**/imported/**/**/*.json'),
  sketchSlices: path.join(__dirname, 'src/*.slices.sketch'),
};
Note the importedFromSketchFold and importedFromSketchJson paths. They are generated by using FramerGenerator.app to import our design.

By clicking on import we will make available all our layers form Sketch in the app.framer folder.
Let’s create some tasks: we will need a clean task to clean up our build folder.
gulp.task(‘clean’, del.bind(null, paths.build));We need tasks that help us to copy our static files (framer.js build, index.html, style.css and images) into our build folder. We create the copy:generator that depends on copy:framerjs and copy:static tasks.
gulp.task('copy:framerjs', function () {
  var stream = gulp.src(paths.framerModuleBuild)
    .pipe(gulp.dest(paths.buildFramer));  return stream;
});gulp.task('copy:static', function () {
  var htmlStream = gulp.src(paths.appHTML)
    .pipe(gulp.dest(paths.build));  var imagesStream = gulp.src(paths.appImages)
    .pipe(gulp.dest(paths.buildImages));  var cssStream = gulp.src(paths.appCSS)
    .pipe(gulp.dest(paths.build));  return mergeStream(htmlStream, imagesStream, cssStream);
});gulp.task('copy:generator', function () {
  var stream = gulp.src(paths.importedFromSketchFold)
    .pipe(gulp.dest(paths.build));  return stream;
});
We create our watch:serve task that will check our main app.coffee, app modules files and imported-by-FramerGenerator folder and when they change it will run copy:generator and webpack tasks (we will soon configure Webpack). Finally our BrowserSync server will start, serving the build folder on default port 3000.
gulp.task('watch:serve', function() {
  browserSync.init({
    server: './build',
    files: [paths.buildFolders],
    notify: true,
  });  gulp.watch([paths.appIndex, paths.appModules], ['webpack']);
  gulp.watch(paths.importedFromSketchFold, ['copy:generator']);
});
Our main tasks will be build and the default task.
The build task will setup our build folder to be served, the default task will run build and watch:serve after cleaning the build folder.
gulp.task('build', [copyTask, 'webpack']);
gulp.task('default', ['build'], function () {
  gulp.start('watch:serve');
});
Webpack
We use Webpack basically to compile our .coffee files. Here I’m not going to explain how it works, just know that it compiles your app.coffee.
Add a webpack.config.js inside your project root, like this:
We now have our automated system for rapid prototyping. Just run
$ gulpIf you want to test with a working sample, copy and paste the following code (from Framer examples page) in your app.coffee and save.
With default Gulp task running, by visiting http://locahost:3000 you should see your prototype example (from Framer Examples).

Let’s create the prototype
Time to start: we create our design (or just a wireframe) in Sketch, import assets with Framer Generator and add interactions with Framer.
You can download the sample app.sketch as your starting point.
Run ‘gulp’ to watch your projects updates and recompile.
Setup presentation device
Add the presentation template you like. Here a list of all available devices. I choose google-nexus-6p with a resolution of 2560x1440.
# setup device for presentation
device = new Framer.DeviceView();device.setupContext()
device.deviceType = "google-nexus-6p"
device.contentScale = 1deviceHeight = device.screen.height
deviceWidth = device.screen.widthprint "Device height: #{deviceHeight}"
print "Device width: #{deviceWidth}"
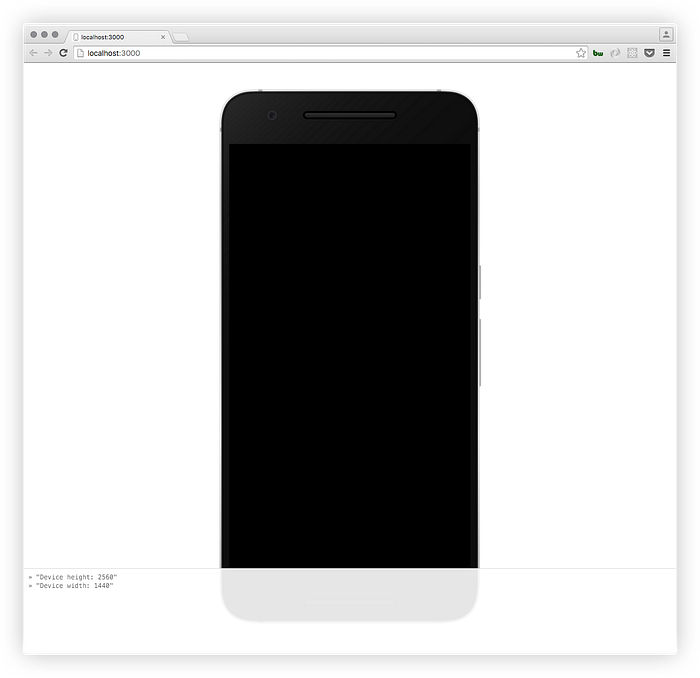
Visiting http://localhost:3000 you should see the following situation: device and resolution log.
Import design
Framer Generator will import your design from Sketch. You can update and re-import it and you can access your entire design in app.coffee by typing:
app = Framer.Importer.load(“app.framer/imported/app@1x”)The app object now represents the entire design.
Setup layers
Keep in mind, you can access different app layers by their group name. With the following situation

to access the iconWrite element we just need to type app.iconWrite.
Let’s make some initial setup: we need to hide some layers, set some variables and create an array of Layers in order to perform animations and interactions later.
# variables to hold a scale value we’ll use later
initialScale = 0.2# array of our actions
actionButtons = []# hide some layers for the initial state
app.actions.opacity = 0
app.overlay.opacity = 0
app.iconWrite.opacity = 0# hide and set initial y position of the keyboard
app.keyboard.opacity = 0
app.keyboard.y = app.keyboard.height + deviceHeightapp.iconWrite.rotation = -180# Create an array of action layers (Add, Reminder, Task)
for i in [0…3]
 actionButtons.push app[“action#{i+1}”]# Add initial scale value to action buttons
for action in actionButtons
 action.scale = initialScale
You should see the following situation at http://localhost:3000

Define states
We define how the different components will change on specific states. We have basically two states at the moment:
- the default state with our elements at their initial state
- the openActions state in which we show all our action buttons (add reminder and add task)
So we define the state openActions and the related animation for each layer involved. The code is really self-explaining.
# define states
app.overlay.states.add
 openActions: { opacity: 1 }
app.overlay.states.animationOptions = curve: “spring(400, 20, 0)”app.actions.states.add
 openActions: { opacity: 1 }
app.actions.states.animationOptions = curve: “spring(400, 20, 0)”for action in actionButtons
 action.states.add
  openActions: { scale: 1 }
 action.states.animationOptions = curve: “spring(500, 30, 0)”app.iconPlus.states.add
 openActions: { opacity: 0, rotation: 90 }
app.iconPlus.states.animationOptions = curve: “spring(500, 30, 0)”app.iconWrite.states.add
 openActions: { opacity: 1, rotation: 0 }
app.iconWrite.states.animationOptions = curve: “spring(500, 30, 0)”
Add events
We add a switchState function that will take the name of the state and will switch layers to that state.
# functions
switchOptions = (state) ->
 app.overlay.states.switch(state)
 app.actions.states.switch(state)

for action in actionButtons
  action.states.switch(state)app.iconPlus.states.switch(state)
app.iconWrite.states.switch(state)
Now we can run this function when we tap on the floating action button switching to the openActions state.
app.floatingButton.on Events.Click, ->
 switchState(“openActions”)
We call the same function when we tap on the overlay for coming back to the default state.
app.overlay.on Events.Click, ->
 switchState(“default”)
Using modules
As said, Framer.js allows us to work with modules. We use a nice module to add our input text element: InputField module by Jordan Dobson.
Download the sample project, got to the module folder, find the InputField.coffee file and copy it into your modules folder.
Open your app.coffee main file now and import the module by typing:
{ InputField } = require ‘InputField’Create the layer and set the initial state (hide it).
# the input element from module
taskInput = new InputField
 name: “task”
 type: “text-area”
 width: deviceWidth
 height: deviceHeight — app.keyboard.height
 color: “DarkCyan”
 backgroundColor: “#f5f5f5”
 fontSize: 200
 indent: 120
 placeHolder: “Add task”
 placeHolderFocus: “”
 autoCapitalize: true# hide the input text element
taskInput.opacity = 0
Now we need to handle the states. We want to show the inputField and the keyboard when the user tap on task action.
We already know how to proceed: create the state for keyboard and inputField, add a switch function and handle events.
# add the openInput state for keyboard and inputField
app.keyboard.states.add
 openInput: { opacity: 1; y: deviceHeight — app.keyboard.height}
app.keyboard.states.animationOptions = { curve: “linear”, time: 0.1 }taskInput.states.add
 openInput: { opacity: 1 }
taskInput.states.animationOptions = curve: “spring(400, 20, 0)”# handle state switch
switchInput = (state) ->
 taskInput.states.switch(state)
 app.keyboard.states.switch(state)# by tapping task action we open the inputField and keyboard
app.action2.on Events.Click, ->
 switchInput(“openInput”)# tap on the keyboard, default!
app.keyboard.on Events.Click, ->
 switchInput(“default”)
 switchOptions(“default”)
That’s all folks! Our prototype is ready to be tested, below the complete app.coffee sample code.
Publishing our demo on Heroku
You need an active Heroku account (https://signup.heroku.com/), it’s free but with some limitations. Create your account and then you can install heroku-toolbelt.
$ brew install heroku-toolbelt
$ heroku login
$ cd ux-framer-prototype
Create the app and start a Git repository.
$ git init`
$ git add .
$ git commit -am “starting!”
$ heroku create *app-name*
We serve static files using Harp, we use a super simple configuration but if you want to learn more take a look at the documentation. You can modify the sample _harp.json where we just define a BasicAuth access.
{
 “basicAuth”: “user:password”
}
In order to make things working on Heroku we provide a Procfile that defines how to start our application on Heroku.
web: harp server ./build — port $PORTAgain, we use Git to add modifications in our repo and then we will push our prototype on Heroku.
$ git add .
$ git commit -am “configured harp server and added Procfile”
$ git push heroku master`
Just hit the following command to start the app and test your prototype.
$ heroku open --app *app-name*Conclusions
I love Framer ’cause it gives us super-powers to animate our designs. It’s not the definitive tool, of course, but with JavaScript we can extend our projects and play with prototypes in a clever way.
Comments, ideas and suggestions are very appreciated. I’ve a lot of ideas to improve this “framework” for rapid prototyping, but yours are very welcome and if you want to collaborate just drop me a line.
Credits and inspiration
New to Framer? Just 3 Things to Get You Started by David Lee
Framer.js for people who think things like Framer.js are weird and hard by Sean Mateer
Rapid Prototyping with Gulp, Framer.js and Sketch by Darrin Henein
Thank you to Walter, Matteo and Luca for the help.


